If you are interested in using cryptocurrencies, especially for interacting with decentralized applications (dApps) on the Ethereum network, you may have heard of Metamask. Metamask is a popular browser extension that allows users to securely store and manage their Ethereum assets, as well as interact with dApps seamlessly.
To get started with Metamask, the first step is to install the extension from the store. Currently, Metamask is available for Google Chrome, Mozilla Firefox, and Brave browsers. Here, we will guide you through the installation process for each respective browser.
- Installing Metamask on Google Chrome
- Installing Metamask on Mozilla Firefox
- Installing Metamask on Brave Browser
- Step 1: Open the Web Store
- How to access the web store on your browser
- How to search for the Metamask extension
- Google Chrome
- Mozilla Firefox
- Microsoft Edge
- Step 2: Install the Metamask Extension
- How to click on the ‘Add to Chrome’ button
- How to confirm the installation
- Setup MetaMask to Connect to BSC Mainnet
- Step 1: Open the MetaMask Extension
- How to find the MetaMask extension in your browser
- How to click on the MetaMask extension icon
- Step 2: Switch to BSC Mainnet
- How to open the settings menu in MetaMask
- How to select the Binance Smart Chain network
- Create a MetaMask Wallet or Import One
- Create a MetaMask Wallet:
- Import an Existing Wallet:
- Step 1: Create a New Wallet
- Frequently Asked Questions:
- What is the Metamask extension?
- Where can I find the Metamask extension?
- Is the Metamask extension available for mobile devices?
- Can I use the Metamask extension on multiple browsers?
- Is the Metamask extension free to use?
- Can I use the Metamask extension with other blockchains?
- Video:
- How to Install MetaMask Extension on Chrome Browser? Install MetaMask Extension 2023
- How to Install MetaMask on Chrome? | MetaMask Extension Installation & Setup
- How to Create Multiple MetaMask Wallets? How To Keep Your Crypto and NFTs Safe Using Google Chrome
Installing Metamask on Google Chrome
To install Metamask on Google Chrome, follow these steps:
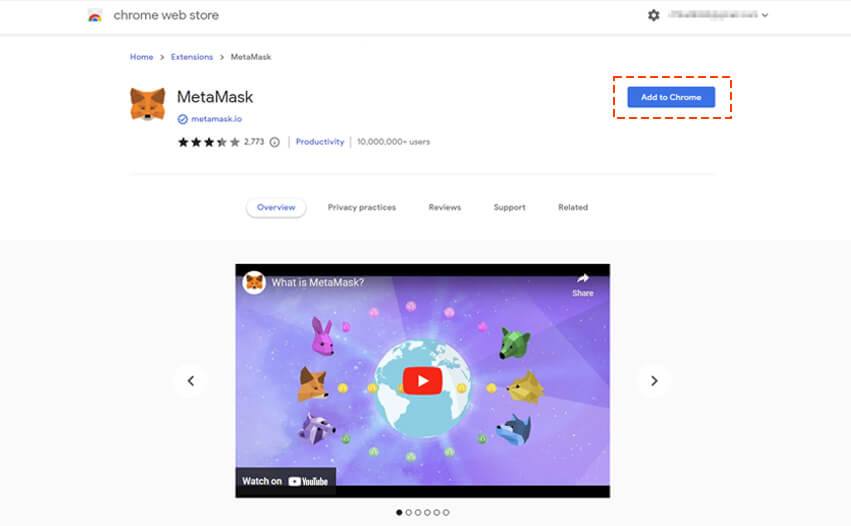
- Open the Chrome Web Store and search for “Metamask” in the search bar.
- Click on the “Add to Chrome” button next to the Metamask extension.
- A pop-up window will appear asking for confirmation to “Add extension.” Click on the “Add extension” button.
- Once the extension is installed, you will see the Metamask fox icon added to your browser’s toolbar.
Now, you have successfully installed the Metamask extension on Google Chrome and you can proceed with setting up your account and importing or creating a new wallet.
Installing Metamask on Mozilla Firefox
To install Metamask on Mozilla Firefox, follow these steps:
- Open the Mozilla Firefox Add-ons Store and search for “Metamask” in the search bar.
- Click on the “Add to Firefox” button next to the Metamask extension.
- A pop-up window will appear asking for confirmation to “Add.” Click on the “Add” button.
- Once the extension is installed, you will see the Metamask fox icon added to your browser’s toolbar.
Now, you have successfully installed the Metamask extension on Mozilla Firefox and you can proceed with setting up your account and importing or creating a new wallet.
Installing Metamask on Brave Browser
To install Metamask on Brave Browser, follow these steps:
- Open the Brave Browser’s Extension Store by clicking on the menu icon and selecting “Extensions”.
- In the Extensions Store, search for “Metamask” in the search bar.
- Click on the “Add to Brave” button next to the Metamask extension.
Now, you have successfully installed the Metamask extension on Brave Browser and you can proceed with setting up your account and importing or creating a new wallet.
By following these steps, you can easily install the Metamask extension from the store and begin your journey into the world of decentralized finance and dApps on the Ethereum network. Happy exploring!
Step 1: Open the Web Store
Before you can install the Metamask extension, you need to open the Web Store in your web browser. The Web Store is an online marketplace where you can find and download a wide range of extensions for different web browsers.
Here is how you can open the Web Store:
- Open your web browser.
- Type “Web Store” in the search bar or enter the URL “https://chrome.google.com/webstore” directly into the address bar.
- Press Enter or click on the search button to load the Web Store.
Once the Web Store is loaded, you will be able to search for and install the Metamask extension.
How to access the web store on your browser
If you want to install the MetaMask extension from the store, you’ll need to access the web store on your browser. Here are the steps to follow:
- Open your preferred browser on your device.
- In the address bar, type in the URL for the web store. This could be different depending on the browser you’re using. For example, on Google Chrome, the web store URL is chrome.google.com/webstore.
- Press Enter or Return to navigate to the web store.
- Once you’re on the web store’s homepage, you can search for the MetaMask extension by typing “MetaMask” in the search bar and pressing Enter or Return.
- From the search results, click on the MetaMask extension listing to view its details page.
- On the details page, you can read more about the MetaMask extension and view its ratings and reviews.
- To install the extension, click on the “Add to Chrome” button or a similar button specific to your browser.
- A confirmation dialog may appear asking for your permission to add the extension. Click on “Add” or “Install” to proceed.
- The extension will then be downloaded and installed on your browser. You may see a progress bar or an icon indicating the installation process.
- Once the installation is complete, a new icon for the MetaMask extension should appear in your browser’s toolbar.
- You can now click on the MetaMask icon to open the extension and set up your MetaMask account.
By following these steps, you should be able to access the web store on your browser and install the MetaMask extension smoothly.
How to search for the Metamask extension

To install the Metamask extension, you will need to find it in the store of your web browser. Here are the steps to search for the Metamask extension in different browsers:
Google Chrome

-
Open Google Chrome and click on the three-dot menu icon in the top-right corner.
-
Hover over “More tools” in the dropdown menu and select “Extensions” from the side menu that appears.
-
In the Extensions page, click on the “Open Chrome Web Store” button located at the bottom-right corner.
-
On the Chrome Web Store, click on the search bar at the top-left corner and type “Metamask”.
-
Press Enter or click on the magnifying glass icon to search for the Metamask extension.
Mozilla Firefox

-
Open Mozilla Firefox and click on the three-line menu icon in the top-right corner.
-
Select “Add-ons” from the dropdown menu.
-
In the Add-ons Manager tab, click on the search bar at the top-right corner and type “Metamask”.
-
Press Enter or click on the magnifying glass icon to search for the Metamask extension.
Microsoft Edge
-
Open Microsoft Edge and click on the three-dot menu icon in the top-right corner.
-
Select “Extensions” from the dropdown menu.
-
In the Extensions page, click on the “Get extensions from Microsoft Store” link located at the bottom-left corner.
-
On the Microsoft Store, click on the search bar at the top-right corner and type “Metamask”.
-
Press Enter or click on the magnifying glass icon to search for the Metamask extension.
Once you have successfully searched for the Metamask extension, you can proceed with installing and setting it up in your web browser.
Step 2: Install the Metamask Extension
Once you have opened your preferred web browser, you can follow these steps to install the Metamask extension:
- Open the extension store in your web browser by clicking on the store icon.
- In the extension store search bar, type “Metamask” and press Enter.
- From the search results, click on the Metamask extension.
- Click the “Add to [Browser Name]” button to start the installation process.
- A confirmation message will appear, asking for your permission to add the extension. Click “Add extension” to proceed.
- Wait for the installation to complete. This may take a few moments.
Once the installation is finished, you will see the Metamask icon added to your browser’s toolbar.
Note: It is essential to download the Metamask extension only from trusted sources, such as the official extension store of your browser.
How to click on the ‘Add to Chrome’ button
Once you have found the Metamask extension in the Chrome Web Store, you can easily install it by following these steps:
- Locate the “Add to Chrome” button on the extension page.
- Click on the “Add to Chrome” button.
- Confirm the installation by clicking on the “Add extension” button in the pop-up window that appears.
- Wait for the installation process to complete. This may take a few moments.
- Once the installation is finished, a confirmation message will appear at the top right corner of the browser window.
After completing these steps, the Metamask extension will be added to your Chrome browser.
How to confirm the installation

After you have successfully installed the MetaMask extension from the store, you need to confirm the installation by following these steps:
- Click on the MetaMask icon in your browser’s toolbar to open the extension.
- A new window will appear, prompting you to either import an existing wallet or create a new one. Choose the option that applies to you.
- If you choose to import an existing wallet, enter the seed phrase or private key associated with your wallet. If you choose to create a new wallet, follow the on-screen instructions to set it up.
- Once you have completed the setup process, you will see your wallet details, including your account balance.
- At this point, your MetaMask extension is successfully installed and ready to use.
It is important to note that the setup process may vary slightly depending on the version of MetaMask you are installing. However, the general steps outlined above should still apply.
Setup MetaMask to Connect to BSC Mainnet
To setup MetaMask to connect to the Binance Smart Chain (BSC) Mainnet, please follow the steps below:
- Ensure that you have installed the MetaMask extension on your web browser. If you haven’t installed it yet, please refer to the article “How to Install the MetaMask Extension from the Store”.
- Click on the MetaMask extension icon in your browser’s toolbar to open the MetaMask interface.
- If you are opening MetaMask for the first time, click “Get Started” on the initial setup screen. If you have already used MetaMask before, click the account switcher on the top right corner and select “Create Account” to add a new BSC Mainnet account.
- Agree to the terms of use and privacy policy by clicking “I Agree”.
- Set up a strong password for your MetaMask account and click “Create”. Make sure to keep this password safe as it will be used to unlock your MetaMask account in the future.
- The next screen will display a secret backup phrase which can be used to restore your MetaMask account. It is highly recommended to write down this backup phrase and keep it in a safe place. Click “Next” when you have securely backed up this phrase.
- On the next screen, you will be asked to confirm your backup phrase by selecting the correct words in the correct order. Once you have completed this step, click “Confirm” to proceed.
- In the account switcher, select your newly created BSC Mainnet account from the dropdown menu.
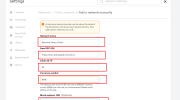
- Click on the account icon on the top right corner and select “Settings”.
- In the “Settings” menu, click on “Networks” and then scroll down to the bottom of the page.
- Click on the “Add Network” button to add a new network.
- In the “New Network” form, enter the following details for the BSC Mainnet:
- Network Name: BSC Mainnet
- New RPC URL: https://bsc-dataseed1.binance.org/ or https://bsc-dataseed2.binance.org/
- Chain ID: 56
- Symbol: BNB
- Block Explorer URL: https://bscscan.com/
- Click on the “Save” button to add the BSC Mainnet network to your MetaMask.
Congratulations! You have successfully set up MetaMask to connect to the BSC Mainnet. You can now use MetaMask to interact with decentralized applications (DApps) and perform transactions on the Binance Smart Chain.
Step 1: Open the MetaMask Extension
To begin the process of installing the MetaMask extension, you will first need to open the extension in your browser. Follow the steps below to open the MetaMask extension:
- Launch your preferred web browser.
- Type “MetaMask” in the search bar or visit the official MetaMask website.
- Click on the MetaMask extension link in the search results or on the website.
- Alternatively, you can directly navigate to the browser extension store and search for “MetaMask”.
- Click on the MetaMask extension in the store to open its details page.
Once you have opened the MetaMask extension, you are ready to proceed to the next step of the installation process.
How to find the MetaMask extension in your browser
Adding the MetaMask extension to your browser is a simple process, and it allows you to access and interact with decentralized applications (dApps) on the Ethereum blockchain. Follow the steps below to find and install the MetaMask extension:
- Open your browser and navigate to the extension store. The specific store may vary depending on your browser:
- Chrome: Open the Chrome Web Store.
- Firefox: Open the Firefox Add-ons store.
- Edge: Open the Microsoft Edge Add-ons store.
- Safari: Open the Safari Extensions Gallery.
- Once you are in the extension store, search for “MetaMask” in the search bar located on the top or side of the store’s homepage. Press enter or click on the search icon to initiate the search.
- The search results will display various extensions related to MetaMask. Look for the official MetaMask extension that is published by “MetaMask”. It should have the MetaMask logo.
- Click on the MetaMask extension to open its details page. Here, you will find more information about the extension and its features.
- Click on the “Add” or “Install” button next to the MetaMask extension’s details. A prompt may appear, asking for confirmation to add the extension.
- Confirm the installation by clicking on the “Add” or “Install” button in the prompt. The MetaMask extension will begin downloading and installing in your browser.
- Once the installation is complete, you will see the MetaMask icon in your browser’s toolbar or menu. Click on the icon to launch MetaMask.
Congratulations! You have successfully found and installed the MetaMask extension in your browser. Now, you can start using MetaMask to manage your Ethereum accounts, interact with dApps, and securely store your cryptocurrencies.
How to click on the MetaMask extension icon
Once you have successfully installed the MetaMask extension from the store, you can easily access it by clicking on its icon.
Here are the steps to click on the MetaMask extension icon:
- Open your web browser. You can use any popular web browser such as Google Chrome, Mozilla Firefox, or Safari.
- Look for the MetaMask extension icon in the browser toolbar. The icon usually appears as a fox head or a colorful round shape.
- Click on the MetaMask extension icon. This will open the MetaMask pop-up window.
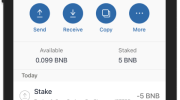
In the MetaMask pop-up window, you can manage your Ethereum wallet, interact with decentralized applications (DApps), view your account balance, and perform various transactions.
It’s important to note that the specific location of the MetaMask extension icon may vary depending on the web browser and its settings. However, in most cases, you should be able to find it easily in the browser toolbar.
Step 2: Switch to BSC Mainnet
After installing the Metamask extension, you need to switch the network to Binance Smart Chain (BSC) Mainnet in order to interact with BSC-based decentralized applications (DApps) and tokens. Follow the steps below to switch to BSC Mainnet:
- Open the Metamask extension by clicking on the Metamask icon located in the browser toolbar.
- Click on the dropdown menu that displays the current network. It is usually set to “Ethereum Mainnet” by default.
- Scroll down the list of available networks and select “Custom RPC”.
- In the “New RPC URL” field, enter the following URL: https://bsc-dataseed1.binance.org/
- In the “Chain ID” field, enter the following number: 56
- Fill in any name you prefer, such as “BSC Mainnet”, in the “Network Name” field.
- Leave the remaining fields as default and click on the “Save” button.
- Once the network is saved, click on the network dropdown menu again and select “BSC Mainnet” from the list.
Now, your Metamask extension is configured to use the Binance Smart Chain (BSC) Mainnet.
How to open the settings menu in MetaMask
To open the settings menu in MetaMask, follow these steps:
- Click on the MetaMask extension icon in your browser’s toolbar. The icon looks like a fox face.
- A drop-down menu will appear. Click on the gear icon at the bottom of the menu. This will open the settings menu.
Alternatively, you can also access the settings menu by clicking on the MetaMask icon and then clicking on the “Settings” option in the left sidebar.
In the settings menu, you can configure various aspects of your MetaMask extension, such as network settings, security options, and account management.
How to select the Binance Smart Chain network
Once you have successfully installed the Metamask extension, you can follow these steps to select the Binance Smart Chain network:
- Click on the Metamask extension icon located in the top-right corner of your browser.
- A popup window will appear. Click on the dropdown menu next to “Main Ethereum Network” or any other network that is currently selected.
- Scroll down and find “Custom RPC” at the bottom of the dropdown menu. Click on “Custom RPC”.
- A new form will appear where you can enter the details for the Binance Smart Chain network.
- In the “Network Name” field, enter “Binance Smart Chain”.
- In the “New RPC URL” field, enter the RPC endpoint for the Binance Smart Chain network, which is https://bsc-dataseed.binance.org/.
- Leave the “Chain ID” field blank, as it will be automatically generated.
- Leave the “Symbol” field blank, as it will be automatically populated.
- Leave the “Block Explorer URL” field blank, as it will be automatically populated.
- After entering all the required details, click on the “Save” button.
Once you have saved the Binance Smart Chain network, you can select it by clicking on the network dropdown menu and choosing “Binance Smart Chain” from the list.
Create a MetaMask Wallet or Import One
To use the MetaMask extension, you need to create a MetaMask wallet or import an existing one. Follow the steps below:
Create a MetaMask Wallet:
- Install the MetaMask extension from the store by following the instructions in the previous section.
- Click on the MetaMask icon in your browser’s toolbar to open the extension.
- Click on “Get Started” on the welcome screen.
- Read and agree to the terms of use, then click on “Create a Wallet”.
- Enter a strong password for your wallet and click on “Create”. Make sure to remember this password, as it will be required to access your wallet in the future.
- You will be provided with a secret backup phrase. This is a crucial step in securing your wallet. Write down the backup phrase and store it in a safe place. This backup phrase can be used to recover your wallet if you forget your password or lose access to your device.
- Confirm your backup phrase by selecting the words in the correct order.
- Once your backup phrase is confirmed, your wallet is created and you can start using MetaMask.
Import an Existing Wallet:
- Install the MetaMask extension from the store by following the instructions in the previous section.
- Click on the MetaMask icon in your browser’s toolbar to open the extension.
- Click on “Get Started” on the welcome screen.
- Read and agree to the terms of use, then click on “Import Wallet”.
- Enter your secret backup phrase or private key in the provided field.
- Choose a strong password for your wallet and click on “Import”.
- Your wallet will be imported and you can start using MetaMask with your existing account.
Step 1: Create a New Wallet
In order to use the Metamask extension, you will need to create a new wallet. Follow the steps below to create your wallet:
- Open the Metamask extension in your browser by clicking on the Metamask icon in your browser toolbar.
- Click on the “Get Started” button on the welcome screen.
- Read and accept the Terms of Use.
- Create a new password for your wallet and confirm it.
- Next, you will see a series of randomly generated words. This is your secret backup phrase. It is important to write down these words in order and keep them in a safe place. This backup phrase can be used to recover your wallet if you ever lose access to it.
- Confirm that you have written down the backup phrase by selecting the words in the correct order.
- Your wallet is now created!
It is important to note that the password you set for your wallet is separate from the password used to unlock your Metamask extension. The wallet password is used to encrypt your private keys, while the extension password is used to protect access to the extension itself.
Frequently Asked Questions:
What is the Metamask extension?
The Metamask extension is a cryptocurrency wallet that allows users to manage and interact with decentralized applications (dApps) on the Ethereum blockchain. It acts as a bridge between the user’s browser and the blockchain, providing a secure and easy-to-use interface.
Where can I find the Metamask extension?
The Metamask extension can be found on various web browsers’ extension stores, such as the Chrome Web Store, Firefox Add-ons, and the Opera Add-ons. Simply search for “Metamask” in the store’s search bar, and you should be able to find and install the extension.
Is the Metamask extension available for mobile devices?
Yes, the Metamask extension is available for mobile devices. It can be downloaded and installed from the Google Play Store for Android devices or the App Store for iOS devices. Simply search for “Metamask” in the respective store’s search bar to find and install the app.
Can I use the Metamask extension on multiple browsers?
Yes, you can use the Metamask extension on multiple browsers. After installing the extension on one browser, you can sign in to your Metamask account on other browsers using your account’s seed phrase or private key. This allows you to easily access and manage your wallet from different devices and browsers.
Is the Metamask extension free to use?
Yes, the Metamask extension is free to use. However, please note that there may be transaction fees associated with using the Ethereum network and decentralized applications. These fees are separate from the Metamask extension itself.
Can I use the Metamask extension with other blockchains?
Yes, the Metamask extension can be used with other blockchains. In addition to Ethereum, Metamask also supports other networks such as Binance Smart Chain and Polygon. Users can switch between different networks within the extension and interact with dApps built on those networks.
Video:
How to Install MetaMask Extension on Chrome Browser? Install MetaMask Extension 2023
How to Install MetaMask on Chrome? | MetaMask Extension Installation & Setup
How to Create Multiple MetaMask Wallets? How To Keep Your Crypto and NFTs Safe Using Google Chrome