If you want to connect your Coinbase Wallet to MetaMask, you’re in the right place. Connecting these two platforms allows you to seamlessly interact with decentralized applications (dApps) and manage your digital assets all in one place. Whether you’re new to the world of cryptocurrencies or an experienced user, this step-by-step guide will walk you through the process.
Step 1: Install MetaMask
Before you can connect your Coinbase Wallet to MetaMask, you need to have MetaMask installed on your browser. MetaMask is a cryptocurrency wallet that allows you to connect to Ethereum-based dApps. You can download and install MetaMask through the official MetaMask website or through the available browser extension stores.
Step 2: Open MetaMask
Once you have MetaMask installed, open it on your browser. You will be prompted to create a new MetaMask wallet or import an existing one. Choose the option that suits you best. If you’re new to MetaMask, follow the instructions to create a new wallet.
Step 3: Connect Coinbase Wallet
With MetaMask open, click on the account icon in the top right corner of the screen. From the dropdown menu, select “Connect Wallet”. You will see a list of compatible wallets, including Coinbase Wallet. Click on “Coinbase Wallet” and follow the prompts to complete the connection.
Step 4: Authorize Connection
Next, go to your Coinbase Wallet app on your mobile device. Access the settings menu and select “Connected Apps”. From there, you should see MetaMask listed as one of the connected apps. Tap on it and authorize the connection. Once the connection is authorized, you will be able to see your Coinbase Wallet balances and transactions within MetaMask.
Step 5: Start Using MetaMask with Your Coinbase Wallet
Now that your Coinbase Wallet is connected to MetaMask, you can start using MetaMask to interact with dApps, manage your digital assets, and complete transactions using your Coinbase Wallet balances. Enjoy the convenience and security of having both platforms connected!
Connecting Coinbase Wallet to MetaMask is a great way to streamline your cryptocurrency management. By following these step-by-step instructions, you can easily connect your Coinbase Wallet to MetaMask and enjoy the benefits of both platforms seamlessly.
- What is Coinbase Wallet?
- Overview
- Features
- What is MetaMask?
- Overview
- Features
- Step 1: Downloading and Setting Up MetaMask
- Downloading MetaMask
- Installing the MetaMask Extension
- Creating a MetaMask Account
- Setting Up MetaMask
- Importing Your Wallet Seed Phrase
- Verifying Your Email Address
- Step 2: Connecting Coinbase Wallet to MetaMask
- Generating a Wallet Address in Coinbase Wallet
- Accessing the Coinbase Wallet App
- Frequently Asked Questions:
- What is Coinbase Wallet?
- What is MetaMask?
- Why would I want to connect Coinbase Wallet to MetaMask?
- Can I connect Coinbase Wallet to MetaMask on any device?
- Video:
- Claim 1 Ethereum to your metamask wallet | Get 1Eth instantly to your wallet _Full guide
What is Coinbase Wallet?
Coinbase Wallet is a mobile application developed by Coinbase that allows users to securely store, manage, and transact with their cryptocurrencies. It is designed to provide a user-friendly and intuitive interface for individuals who want to connect their Coinbase Wallet to other platforms, such as MetaMask.
With Coinbase Wallet, users can easily access their digital assets and take control of their private keys, giving them full ownership and control over their funds. The wallet supports a wide range of cryptocurrencies, including Bitcoin, Ethereum, Litecoin, and many others, making it a versatile solution for cryptocurrency enthusiasts.
One of the main features of Coinbase Wallet is its seamless integration with dApps (decentralized applications). Users can connect their Coinbase Wallet to various dApps and interact with them directly from the wallet, without the need for additional accounts or transfers. This allows users to engage in activities such as decentralized finance (DeFi), gaming, and NFT trading.
In addition to its ease of use and dApp integration, Coinbase Wallet also prioritizes security. The wallet utilizes a combination of biometric authentication and industry-standard security measures to protect the user’s private keys and funds. Moreover, the wallet allows users to back up their wallets, providing an extra layer of security and peace of mind.
Overall, Coinbase Wallet serves as a powerful tool for individuals who want to connect their Coinbase Wallet to MetaMask and other platforms. It provides a secure and user-friendly environment for managing and transacting with cryptocurrencies, along with seamless integration with dApps for enhanced functionality.
Overview
In this step-by-step guide, you will learn how to connect your Coinbase Wallet to MetaMask. If you want to access your Coinbase Wallet and use its functionality within the MetaMask browser extension, you will need to follow the instructions provided. By connecting these two wallets, you can easily manage your digital assets and interact with decentralized applications (dApps) on various blockchain networks.
This guide will walk you through the necessary steps to establish a connection between Coinbase Wallet and MetaMask. You will need to have both wallets set up and installed on your device prior to proceeding. Once connected, you will be able to view your Coinbase Wallet balance and transfer funds between your Coinbase Wallet and MetaMask.
Follow the instructions carefully to ensure a successful connection between Coinbase Wallet and MetaMask. Note that the process may vary slightly depending on the device and software versions you are using.
Features
To fully utilize the capabilities of both Coinbase Wallet and MetaMask, users need to connect the two wallets. This connection allows for seamless and secure interaction between the two platforms, offering several key features:
- Wallet Integration: Connecting Coinbase Wallet to MetaMask enables users to access their Coinbase wallet directly through the MetaMask interface. This integration streamlines the workflow and provides a unified user experience.
- Cross-Wallet Compatibility: With the connection established, users can easily transfer funds between their Coinbase Wallet and MetaMask. This cross-wallet compatibility allows for greater flexibility in managing and utilizing cryptocurrency assets.
- Enhanced Security: Both Coinbase Wallet and MetaMask provide advanced security features to protect users’ digital assets. By connecting the two wallets, users can benefit from the combined security measures implemented by both platforms.
- Expanded Functionality: Integrating Coinbase Wallet with MetaMask offers access to a wider range of decentralized applications (dApps) and decentralized finance (DeFi) protocols. Users can explore and participate in various blockchain-based projects directly from MetaMask.
By connecting Coinbase Wallet to MetaMask, users can take advantage of these features to streamline their cryptocurrency management, enhance security, and expand their access to the growing decentralized ecosystem.
What is MetaMask?
MetaMask is a digital wallet and a gateway to the decentralized web. It is a browser extension that allows users to connect to and interact with various blockchain networks, such as Ethereum. MetaMask provides a secure and convenient way to manage cryptocurrencies, access decentralized applications (DApps), and participate in blockchain transactions.
In order to use MetaMask, you need to download and install the extension on your preferred web browser. Once installed, you can create a new wallet or import an existing one using your private key or recovery phrase. MetaMask securely stores your cryptocurrency holdings and enables you to easily connect with decentralized exchanges, decentralized finance (DeFi) protocols, and other blockchain-based services.
MetaMask acts as a bridge between your web browser and the Ethereum network, allowing you to interact with Ethereum-based applications without the need to run a full Ethereum node. It provides a user-friendly interface where you can view your account balance, send and receive Ethereum and ERC-20 tokens, and sign transactions securely.
Additionally, MetaMask protects users’ private keys and sensitive information by encrypting them locally on their device. This ensures that only the user has access to their wallet and funds, providing enhanced security.
| Key Features of MetaMask: |
|
By connecting your Coinbase Wallet to MetaMask, you can further enhance the functionality and accessibility of your cryptocurrency holdings. This integration allows you to easily manage and transfer your funds, while also gaining access to the vast ecosystem of DApps and decentralized services available on the Ethereum network.
Overview
In this step-by-step guide, we will explain how to connect your Coinbase wallet to MetaMask. If you want to use your Coinbase wallet with the MetaMask browser extension, you will need to follow these instructions.
MetaMask is a popular browser extension that allows users to interact with decentralized applications (DApps) on the Ethereum blockchain. By connecting your Coinbase wallet to MetaMask, you can easily manage and access your Ethereum assets through the MetaMask interface.
If you have a Coinbase wallet and want to use MetaMask for interacting with DApps, this guide will provide you with the necessary steps to connect your Coinbase wallet to MetaMask.
Below is a step-by-step process on how to connect your Coinbase wallet to MetaMask:
Features
- Secure Wallet Integration: Coinbase Wallet can be securely connected to MetaMask, allowing users to access their funds and perform transactions directly from their MetaMask wallet.
- Convenient and Seamless Experience: By connecting Coinbase Wallet to MetaMask, users can enjoy a streamlined experience of managing their cryptocurrency assets, without the need to switch between different wallets.
- Expanded Token Support: Connecting Coinbase Wallet to MetaMask expands the list of supported tokens and allows users to manage a wider range of cryptocurrencies within the MetaMask interface.
- Enhanced Privacy: Coinbase Wallet’s privacy features can be leveraged when connected to MetaMask, providing users with additional safeguards for their transactions and personal information.
- Built-in DApp Browser: MetaMask comes with its own built-in DApp browser, which allows users to easily explore and interact with various decentralized applications (DApps) directly from their connected Coinbase Wallet.
- Access to DeFi Ecosystem: With the integration of Coinbase Wallet and MetaMask, users gain access to the growing decentralized finance (DeFi) ecosystem, enabling them to participate in DeFi platforms and access advanced financial instruments.
- Synchronization Across Devices: By connecting Coinbase Wallet to MetaMask, users can synchronize their wallet information and transaction history across multiple devices, ensuring a seamless experience regardless of the device being used.
Step 1: Downloading and Setting Up MetaMask

To connect your Coinbase wallet to MetaMask, you will first need to download and set up the MetaMask extension on your web browser. Follow the steps below to get started:
- Open your web browser and go to the MetaMask website.
- Click on the “Download” button to start downloading the MetaMask extension.
- Once the download is completed, click on the file to install it.
- Follow the installation instructions and click on the “Add to Chrome” button (or equivalent for your web browser).
- The MetaMask icon should now appear in your browser’s extension toolbar. Click on it to open MetaMask.
- On the MetaMask welcome screen, click on the “Get Started” button.
- Create a new wallet by clicking on the “Create a Wallet” button.
- Set a strong password for your wallet and click on the “Create” button.
- Read and accept the terms of use by clicking on the checkbox.
- Click on the “Next” button.
- Backup your wallet by clicking on the “Reveal Secret Words” button.
- Write down the secret backup phrase (seed phrase) provided by MetaMask. This is crucial for recovering your wallet in case of loss or device change.
- Confirm your backup phrase by selecting the words in the correct order.
- Click on the “Confirm” button.
- Your MetaMask wallet is now set up and ready to use. You can either import an existing wallet or continue with the new wallet you just created.
Once you have successfully downloaded and set up MetaMask, you can proceed to the next steps to connect your Coinbase wallet.
Downloading MetaMask

If you want to connect your Coinbase Wallet to MetaMask, you will first need to download the MetaMask extension on your browser. Follow the steps below to download MetaMask:
- Open your web browser and go to the MetaMask website.
- Click on the “Get Chrome Extension” button if you are using Google Chrome, or “Get Firefox Extension” if you are using Mozilla Firefox.
- You will be redirected to the respective browser extension stores. Click on the “Add to Chrome” button for Google Chrome or “Add to Firefox” button for Mozilla Firefox.
- A pop-up confirmation will appear. Click on “Add extension” to confirm the installation.
- Once the installation is complete, you will see the MetaMask icon added to your browser’s toolbar.
Now that you have downloaded MetaMask, you can proceed to the next step of connecting your Coinbase Wallet to MetaMask.
Installing the MetaMask Extension

To connect Coinbase Wallet to MetaMask, you first need to install the MetaMask extension. Follow these steps:
- Open your preferred web browser and go to the MetaMask website at metamask.io.
- Click on the “Get Chrome Extension” or “Get Firefox Add-On” button, depending on the browser you are using. This will redirect you to the extension page on the respective browser’s web store.
- On the extension page, click on the “Add to [Browser Name]” button to start the installation process. A pop-up might appear asking for confirmation.
- After the installation is complete, the MetaMask icon should appear in your browser’s extension toolbar.
Note: If you are using a different browser than Google Chrome or Mozilla Firefox, make sure to check if MetaMask is available as an extension for your browser.
Creating a MetaMask Account
To connect your Coinbase wallet to MetaMask, you will need to create a MetaMask account. Follow the steps below to do so:
- Download and install the MetaMask extension for your preferred web browser.
- Click on the extension icon in your browser toolbar to open MetaMask.
- Click on the “Get Started” button.
- A pop-up window will appear with the terms of service. Read and review the terms, then click on the “Accept” button.
- Create a strong password for your MetaMask account and enter it in the designated field.
- Click the “Create” button to generate your MetaMask seed phrase. Make sure to write down your seed phrase and store it in a secure location. This phrase is essential for accessing your MetaMask account in case you lose your password.
- Confirm your seed phrase by entering it in the correct order. This step ensures that you have properly noted down your seed phrase.
- Set a unique name for your MetaMask account to help you identify it.
- Choose a suitable image for your account avatar (optional).
- Once you have completed these steps, your MetaMask account will be successfully created.
Now that you have a MetaMask account, you can proceed to connect it to your Coinbase wallet.
Setting Up MetaMask
To connect your Coinbase Wallet to MetaMask, you will first need to have MetaMask installed and set up on your browser. The following steps will guide you through the process:
- Open your browser and go to the MetaMask website.
- Click on the “Get Started” button to begin the installation process.
- Choose your preferred browser and click on the “Install MetaMask” button.
- Follow the on-screen instructions to complete the installation.
- Once the installation is complete, click on the MetaMask extension icon in your browser toolbar.
- Click on the “Get Started” button on the MetaMask welcome screen.
- Create a new wallet by clicking on the “Create a Wallet” button.
- Set a strong password that you will use to unlock your wallet.
- Read and accept the terms of use and privacy policy.
- Click on the “Create” button to create your new MetaMask wallet.
After setting up MetaMask, you will be able to connect it to your Coinbase Wallet using the steps outlined in the tutorial.
Importing Your Wallet Seed Phrase

If you want to connect your Coinbase wallet to MetaMask, you will need to import your wallet seed phrase. The seed phrase is a unique combination of words that acts as a backup and allows you to restore your wallet if you ever lose access to it. To import your wallet seed phrase, follow these steps:
- Open the MetaMask extension on your browser.
- Click on the MetaMask icon in your browser’s toolbar.
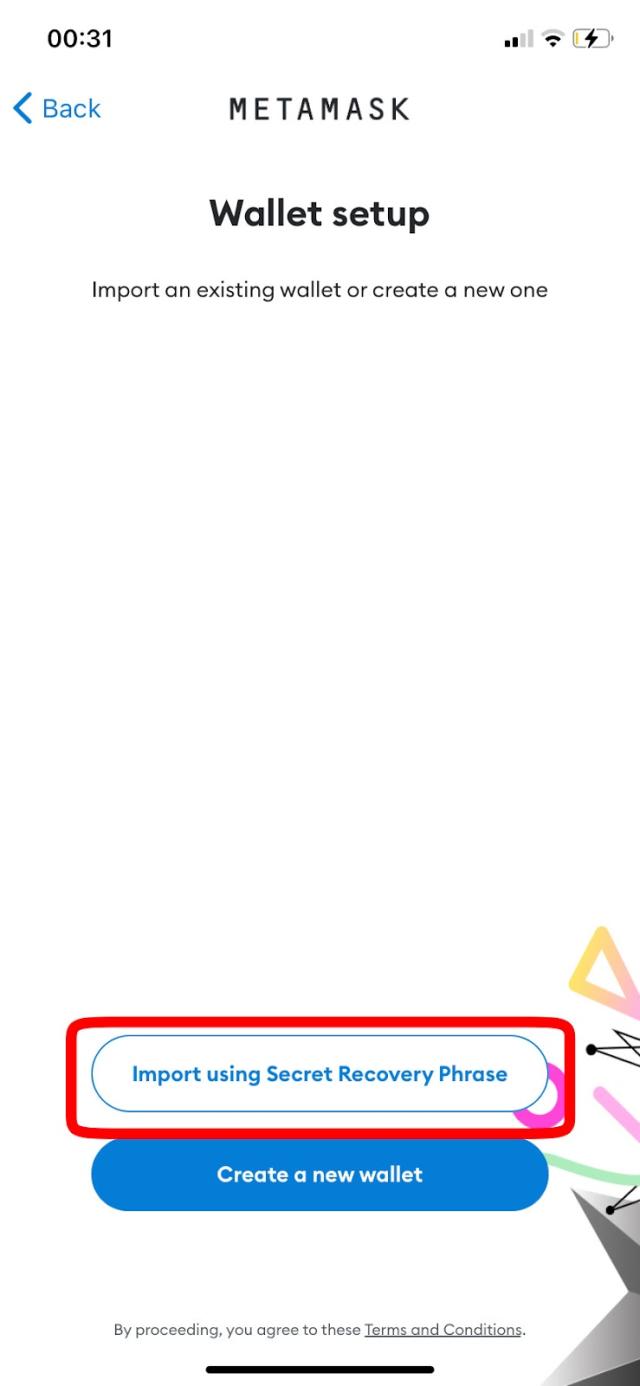
- A pop-up window will appear. Click on the “Import Wallet” option.
- On the next screen, select the “Seed Phrase” option.
- Enter your wallet seed phrase into the text box.
- Click on the “Import” button to proceed.
- MetaMask will validate your seed phrase and import your Coinbase wallet.
- You will now be able to manage your Coinbase wallet through MetaMask.
Importing your wallet seed phrase allows you to access your Coinbase wallet through MetaMask and take advantage of its features and functionalities. Make sure to keep your seed phrase secure and never share it with anyone.
Verifying Your Email Address
Before you can start using your Coinbase Wallet with MetaMask, you will need to verify your email address. This step is necessary to ensure the security and integrity of your account.
To verify your email address, follow these steps:
-
Open your email inbox and locate the verification email from Coinbase Wallet. Please note that it may take a few moments for the email to arrive.
-
Open the email and click on the verification link provided. This link will redirect you to the Coinbase Wallet website.
-
Once you are on the Coinbase Wallet website, you will see a confirmation message indicating that your email address has been successfully verified.
Verifying your email address is an important security measure that helps protect your personal information and ensures that you have full access to your Coinbase Wallet account. It is recommended that you complete this step as soon as possible to avoid any potential issues or restrictions.
If you did not receive the verification email, please check your spam or junk folder. If you still cannot locate the email, you can resend the verification email from your Coinbase Wallet account settings.
Once your email address has been verified, you can proceed with connecting your Coinbase Wallet to MetaMask and enjoy the benefits of using both platforms together.
Step 2: Connecting Coinbase Wallet to MetaMask

Once you have both MetaMask and Coinbase Wallet installed on your device, you can now connect them together for a seamless experience. Follow these simple steps to establish the connection:
- Open the Coinbase Wallet app on your device.
- Tap on the menu icon located at the bottom of the screen.
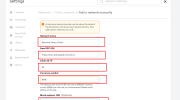
- Select the “Settings” option from the menu.
- Scroll down and find the “Wallet Link” section.
- Tap on the “Connect to a DApp” option within the “Wallet Link” section.
- A QR code will appear on the screen.
- Leave the Coinbase Wallet app open and switch to the MetaMask app on your device.
- Open the MetaMask app.
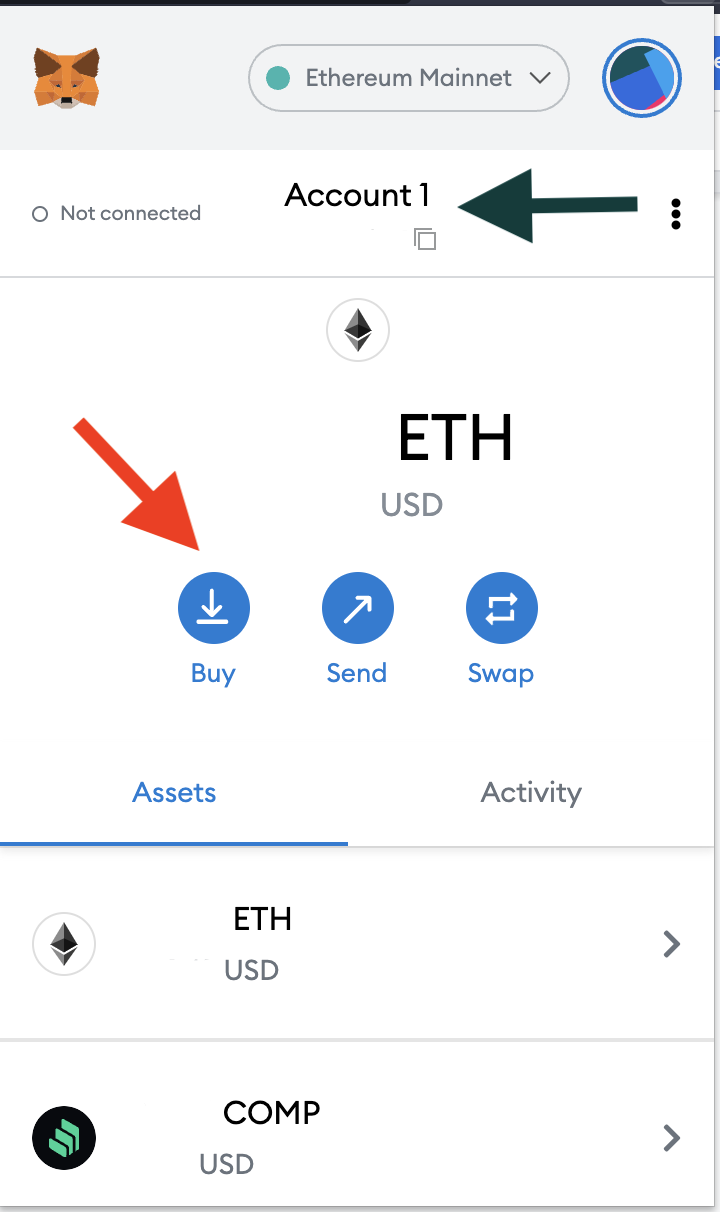
- Tap on the profile icon located at the top right corner of the screen.
- Select the “Scan QR” option from the menu.
- Position your device’s camera over the QR code displayed in the Coinbase Wallet app.
- Wait for MetaMask to scan and process the QR code.
- You will be redirected to a confirmation screen in the MetaMask app.
- Review the information and permissions requested by Coinbase Wallet.
- If you are satisfied, tap on the “Connect” button.
- Congratulations! You have successfully connected Coinbase Wallet to MetaMask.
By connecting these two popular wallet apps, you can easily manage your cryptocurrencies and seamlessly switch between the two platforms whenever you need or want to access your digital assets.
Generating a Wallet Address in Coinbase Wallet
If you want to connect your Coinbase Wallet to MetaMask, you will need to first generate a wallet address in your Coinbase Wallet.
- Open the Coinbase Wallet application on your mobile device.
- On the main screen, tap on the “Wallets” tab to view your existing wallets.
- Tap on the “+” button or “Add Wallet” option to create a new wallet.
- Choose the type of wallet you want to create. Coinbase Wallet offers options like Bitcoin, Ethereum, and more.
- Follow the setup instructions provided by Coinbase Wallet to set up and secure your new wallet.
- Once your wallet is set up, you will be assigned a unique wallet address.
This wallet address is the one you will need to connect to MetaMask.
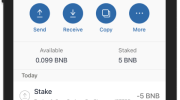
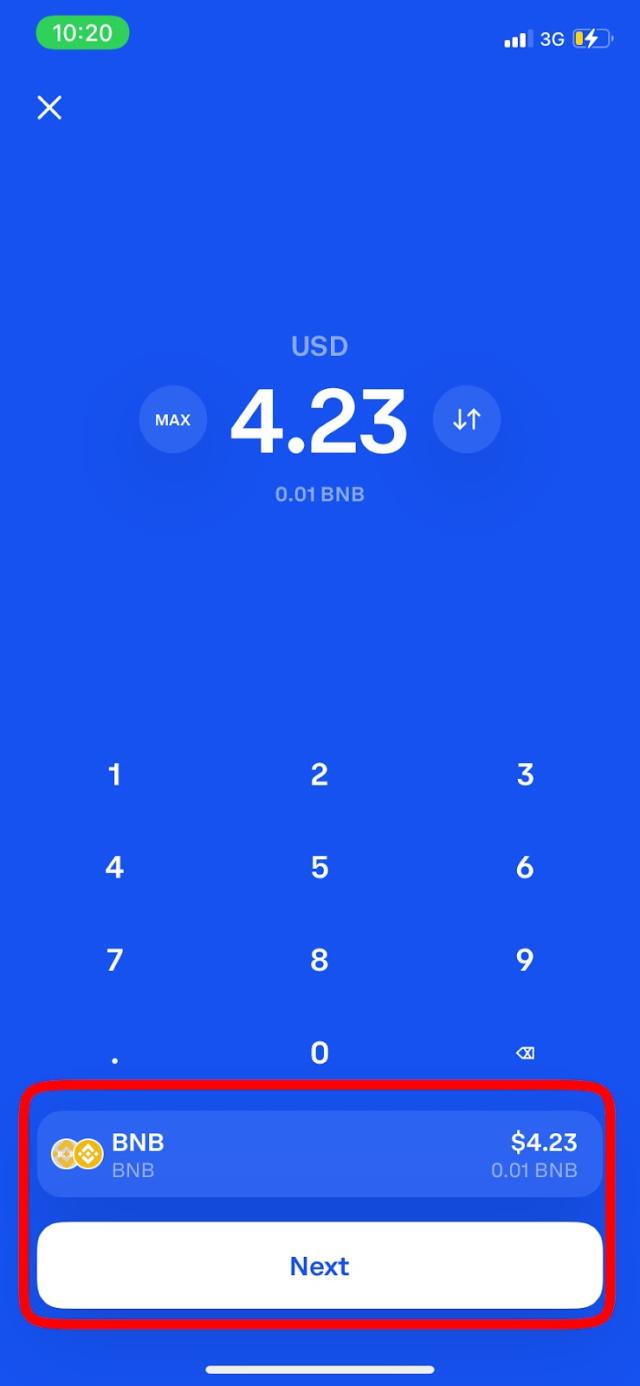
You can find your wallet address by navigating to the “Wallets” tab in Coinbase Wallet, locating the wallet you created, and tapping on it. Look for the “Receive” or “Receive Funds” option, as it typically displays your wallet address.
Make sure to carefully copy and save your wallet address, as you will need it in the next steps when connecting to MetaMask.
Accessing the Coinbase Wallet App
In order to connect your Coinbase Wallet to MetaMask, you will first need to access the Coinbase Wallet mobile app. Here are the steps to accomplish this:
- If you don’t already have the Coinbase Wallet app installed on your mobile device, go to your device’s app store (e.g., Google Play Store or Apple App Store) and search for “Coinbase Wallet”.
- Download and install the Coinbase Wallet app.
- Once the app is installed, open it on your mobile device.
- If you already have a Coinbase account and want to connect your Coinbase Wallet to MetaMask, tap on “Connect to Coinbase”. Otherwise, if you don’t have a Coinbase account, tap on “Create a Wallet” and follow the instructions to create one. Then, you can connect your Coinbase Wallet to MetaMask.
- If you tapped on “Connect to Coinbase”, you will be prompted to sign in to your Coinbase account. Enter your Coinbase account credentials and tap “Sign in”.
- After signing in, you may be asked to allow the Coinbase Wallet app to access your Coinbase account details. Tap on “Allow” to grant permission.
- Congratulations! You have successfully accessed the Coinbase Wallet app. Now, you can proceed to the next steps to connect your Coinbase Wallet to MetaMask.
By following these steps, you will be ready to connect your Coinbase Wallet to MetaMask and begin transferring and managing your cryptocurrency assets seamlessly.
Frequently Asked Questions:
What is Coinbase Wallet?
Coinbase Wallet is a mobile crypto wallet and dApp browser provided by Coinbase, a leading cryptocurrency exchange. It allows users to securely store and manage their digital assets, as well as interact with decentralized applications.
What is MetaMask?
MetaMask is a browser extension that serves as a crypto wallet and allows users to interact with the Ethereum blockchain. It provides access to decentralized applications and enables users to securely store and manage their Ethereum-based tokens.
Why would I want to connect Coinbase Wallet to MetaMask?
Connecting Coinbase Wallet to MetaMask allows you to bridge the gap between the mobile and browser platforms. It enables you to seamlessly transfer funds, access dApps on both platforms, and manage your digital assets from a unified interface.
Can I connect Coinbase Wallet to MetaMask on any device?
Yes, you can connect Coinbase Wallet to MetaMask on any device that supports the MetaMask browser extension and has the Coinbase Wallet mobile app installed. This includes desktop computers and laptops for the browser extension, and iOS or Android smartphones for the mobile app.
Video:
Claim 1 Ethereum to your metamask wallet | Get 1Eth instantly to your wallet _Full guide