
If you’re looking to transfer, store, and manage your Avalanche tokens, you’re in the right place. MetaMask, the popular Ethereum wallet, has recently added support for the Avalanche network, making it easier than ever to interact with and use Avalanche tokens.
In this step-by-step guide, we’ll walk you through the process of adding Avalanche to your MetaMask wallet, so you’re ready to start using Avalanche and its ecosystem of applications and services.
Step 1: Prepare MetaMask for Avalanche
First, make sure you have the latest version of MetaMask installed on your web3-enabled browser. If you don’t have MetaMask yet, you can download it from the official MetaMask website. Once you have it installed, open MetaMask and click on the network selection dropdown at the top of the page.
Step 2: Add the Avalanche Network
In the network selection dropdown, click on “Custom RPC” to manually add a new network. In the “New RPC URL” field, enter the Avalanche X-Chain endpoint: https://api.avax.network/ext/bc/C/rpc. Next, give your network a name, such as “Avalanche,” and enter the currency symbol and chain ID. The currency symbol for Avalanche is AVAX, and the chain ID is 43114. Click “Save” to add the Avalanche network to MetaMask.
Step 3: Accessing Avalanche on MetaMask
Now that you’ve added the Avalanche network to MetaMask, you can switch to the Avalanche network by selecting it from the network selection dropdown. Once you’re on the Avalanche network, you can view your Avalanche wallet address and balances. You’ll also be able to send and receive Avalanche tokens, interact with Avalanche dApps, and more.
Step 4: Storing and Managing Avalanche
With MetaMask and Avalanche connected, you can now safely store and manage your Avalanche tokens. MetaMask provides secure wallet features like password protection, seed phrase backup, and hardware wallet integration. You can also view and manage your transaction history, set gas fees, and track your tokens’ performance.
By adding Avalanche to MetaMask, you gain access to one of the fastest-growing blockchain networks with low transaction fees. You can participate in the Avalanche ecosystem, trade on Avalanche-based decentralized exchanges, and earn staking rewards. MetaMask continues to expand its support for different networks and chains, enabling you to seamlessly navigate the world of decentralized finance.
Adding Avalanche to MetaMask allows you to take full advantage of what Avalanche and its vibrant ecosystem have to offer. Whether you’re a developer, trader, or simply a blockchain enthusiast, this integration opens up endless possibilities for you to explore and engage with the Avalanche network.
Stay tuned for more guides and tutorials on blockchain and cryptocurrencies on beincrypto.com!
- Step 1: Install MetaMask to Your Browser
- How do I switch networks in MetaMask?
- Step 2: Set up a Seed Phrase
- Does MetaMask support Avalanche?
- Step 3: Select a Network
- Adding networks to MetaMask is simple
- Frequently asked questions
- Step 4: Add Avalanche to MetaMask
- How to add Avalanche to MetaMask
- Using Avalanche network with MetaMask
- Disclaimer
- What is the difference between C-Chain and X-Chain on Avalanche?
- C-Chain
- X-Chain
- Conclusion
- Sending and receiving AVAX tokens
- Frequently Asked Questions:
- What is MetaMask?
- What is Avalanche?
- Why would I want to add Avalanche to MetaMask?
- Can I use Avalanche with MetaMask on mobile devices?
- Are there any fees associated with adding Avalanche to MetaMask?
- Is Avalanche compatible with other blockchain networks?
- Videos:
- How to INSTALL Metamask Mobile Wallet | App Tutorial + Navigation
Step 1: Install MetaMask to Your Browser
First, you need to install MetaMask to your web browser. MetaMask is a digital wallet that allows you to manage your cryptocurrencies and interact with decentralized applications (dApps) on the Ethereum network and other compatible networks.
To get started, follow these steps:
- Open your web browser and go to the MetaMask website.
- Click on the “Get Chrome Extension” button if you’re using Google Chrome, or “Get Firefox Add-on” if you’re using Mozilla Firefox. This will redirect you to the respective extension marketplace.
- Click on the “Add to Chrome” or “Add to Firefox” button to install MetaMask.
- A pop-up will appear, asking if you want to add the extension. Click on “Add extension” to proceed with the installation.
- Once the installation is complete, you will see the MetaMask icon added to your browser’s toolbar.
Congratulations! You have successfully installed MetaMask to your browser.
In the next step of this guide, we will walk you through the process of adding the Avalanche network to your MetaMask wallet and transferring AVAX tokens.
How do I switch networks in MetaMask?

MetaMask is one of the most popular wallets for managing cryptocurrencies and interacting with decentralized applications (dApps) on the Ethereum blockchain. However, it also supports various other networks, including Avalanche (AVAX).
If you want to switch networks in MetaMask, follow this step-by-step guide:
- First, open your MetaMask extension or mobile app.
- Next, click on the network indicator at the top of the MetaMask extension or the bottom of the MetaMask app, where it displays the current network.
- When you click on the network indicator, a dropdown menu will appear, showing the available networks.
- Scroll down and select “Custom RPC” to add a new network.
- In the “New Network” section, you need to provide the network details.
- Enter a name for the network, for example, “Avalanche” or “AVAX”.
- Then, enter the Avalanche network’s RPC URL in the “New RPC URL” field. The RPC URL for the Avalanche Mainnet is usually “https://api.avax.network/ext/bc/C/rpc”.
- Leave the “ChainID” field as it is.
- As for the symbol, you can enter “AVAX” or any other symbol you prefer.
- Under “Block Explorer URL,” you can add the Avalanche block explorer’s URL if you want.
- Click on “Save” to add the Avalanche network to your MetaMask wallet.
- After saving, you will see the new network listed in the dropdown menu.
- Now, you can select the Avalanche network to switch to it.
By switching to the Avalanche network in MetaMask, you can access AVAX and use its features. Keep in mind that transferring funds between networks may involve fees or commissions. When storing assets on different chains, such as the Ethereum Mainnet or the Avalanche Mainnet, make sure to use the correct address format and always double-check the chain you are interacting with.
For more information, you can visit the official MetaMask support page or consult the documentation provided by Avalanche or other relevant projects.
Step 2: Set up a Seed Phrase

In this guide, we will walk you through the process of adding Avalanche to your MetaMask wallet. Once you have successfully installed MetaMask, the next step is to set up a seed phrase.
A seed phrase, also known as a recovery phrase, is a series of words that serve as a backup for your wallet. It is a crucial step in securing your funds, as it allows you to restore your wallet in case you lose access to it.
To set up a seed phrase, follow these steps:
- Open the MetaMask extension in your web3 browser.
- Click on the account icon in the top-right corner of the MetaMask popup.
- Select “Settings” from the dropdown menu.
- On the Settings page, click on “Security & Privacy”.
- Scroll down to the “Seed Phrase” section and click on “Reveal Seed Phrase”.
- Follow the instructions to confirm your identity, such as entering your account password.
- Once you’ve confirmed your identity, your seed phrase will be revealed.
It is essential to keep your seed phrase safe and secure. Do not share it with anyone, and do not store it electronically, such as taking a screenshot or saving it on your computer.
We recommend writing down the seed phrase on a piece of paper and storing it in a secure location, like a safe or a lockbox. This physical backup ensures that your funds are protected even if your digital devices are compromised.
Remember, your seed phrase is the key to accessing your funds on any chain you have added to your MetaMask wallet. Preserve it carefully to avoid losing your assets.
Once you have completed this step, you are ready to move on to the next part of the guide: adding Avalanche to your MetaMask wallet.
Does MetaMask support Avalanche?

MetaMask is a popular web3 wallet that allows users to store, manage, and interact with different blockchain networks. In this guide, we will explore whether MetaMask supports Avalanche, a next-generation blockchain network.
MetaMask currently supports various chains such as Ethereum, Binance Smart Chain, and many others. While MetaMask does not natively support Avalanche, users can still access the Avalanche network through MetaMask by following a few simple steps.
To add Avalanche to your MetaMask wallet, you will need to use the Avalanche Wallet, which is an extension similar to MetaMask. By using the Avalanche Wallet, you can connect it to your MetaMask and transfer funds seamlessly between chains.
Here is a step-by-step guide on how to add Avalanche to your MetaMask:
- Install the Avalanche Wallet from the official web3 page or the Chrome Web Store.
- Once installed, open the Avalanche Wallet extension.
- Click on the Chain dropdown menu and select the X-Chain (Avalanche’s main chain).
- Click on the MetaMask icon on the Avalanche Wallet.
- A new MetaMask window will open, asking for permission to connect to the Avalanche network. Click on “Connect”.
- Your MetaMask wallet is now connected to Avalanche, and you can start transferring AVAX and interacting with the Avalanche ecosystem.
By following these steps, you can easily add Avalanche to your MetaMask wallet and access the chain. Remember that when you’re on the Avalanche network, your MetaMask will display the X-Chain information, including your AVAX balance and transaction history.
So, while MetaMask does not directly support Avalanche, using the Avalanche Wallet extension allows users to connect their MetaMask wallets to the Avalanche network and enjoy the benefits of both ecosystems.
Next time you want to use Avalanche with MetaMask, simply open the Avalanche Wallet extension and connect it to your MetaMask to access your AVAX and interact with the platform.
Sources: beincrypto
Step 3: Select a Network

Once you have added Avalanche to your MetaMask wallet, you need to select the network you want to connect to. This step is important because each network has its own chain and assets, so you want to make sure you’re on the correct one.
To select a network, follow these steps:
- Open MetaMask in your browser and navigate to the wallet page.
- On the wallet page, click on the network dropdown menu. It’s usually located at the top of the page, next to your account balance.
- From the dropdown menu, select the Avalanche chain you want to connect to. The most common one is the X-Chain (avax). If you’re unsure, you can check with the guide or the web3 page for more information on the different chains and their purposes.
- After selecting the chain, MetaMask will prompt you to confirm the network switch. Click “Switch Network” to proceed.
- Once the network switch is complete, you’re ready to start using MetaMask with Avalanche!
It’s important to note that transferring tokens or assets between different networks may require additional steps or fees. Make sure to double-check the process before initiating any transfers.
Additionally, storing your assets on different networks allows you to take advantage of the unique features and opportunities offered by each chain. You can easily switch between networks within MetaMask, making it convenient to manage your assets across various chains.
Adding networks to MetaMask is simple
If you are using MetaMask, adding new networks to your wallet is a straightforward process. Whether you want to connect to the Avalanche network or any other blockchain, MetaMask makes it easy to expand your options for managing your digital assets.
MetaMask is a popular web3 wallet that allows you to interact with decentralized applications (dApps) on various blockchains. By default, it is set to the Ethereum mainnet. However, you can easily add additional chains by following a few simple steps.
- First, open the MetaMask extension in your browser. It can be found in the top-right corner of your page.
- Click on the network dropdown menu, which is usually displayed as “Ethereum Mainnet”.
- Scroll down and click on “Custom RPC” to add a new chain.
- Provide the necessary details for the new network, such as the network name, its RPC URL, and the chain ID. For Avalanche, the RPC URL for the X-Chain is “https://api.avax.network/ext/bc/C/rpc”, and the chain ID is 43114.
- Click “Save” to add the new network to your MetaMask wallet.
- Once the network is added, you can switch between different networks using the network dropdown menu.
Now, you’re all set! With the Avalanche network added to MetaMask, you can easily transfer AVAX or interact with dApps on the Avalanche ecosystem. Just make sure you have AVAX tokens on the X-Chain, as some transactions may require a small amount of AVAX to cover network commissions.
Adding networks to MetaMask gives you the flexibility to use different blockchain protocols and explore the functionalities offered by various ecosystems. It’s a convenient way to manage your digital assets and interact with different decentralized applications.
Frequently asked questions

-
What is MetaMask?
MetaMask is a popular web3 wallet that allows users to interact with decentralized applications (dApps) on various blockchains directly from their web browser. It serves as a bridge between users and the blockchain networks they want to access.
-
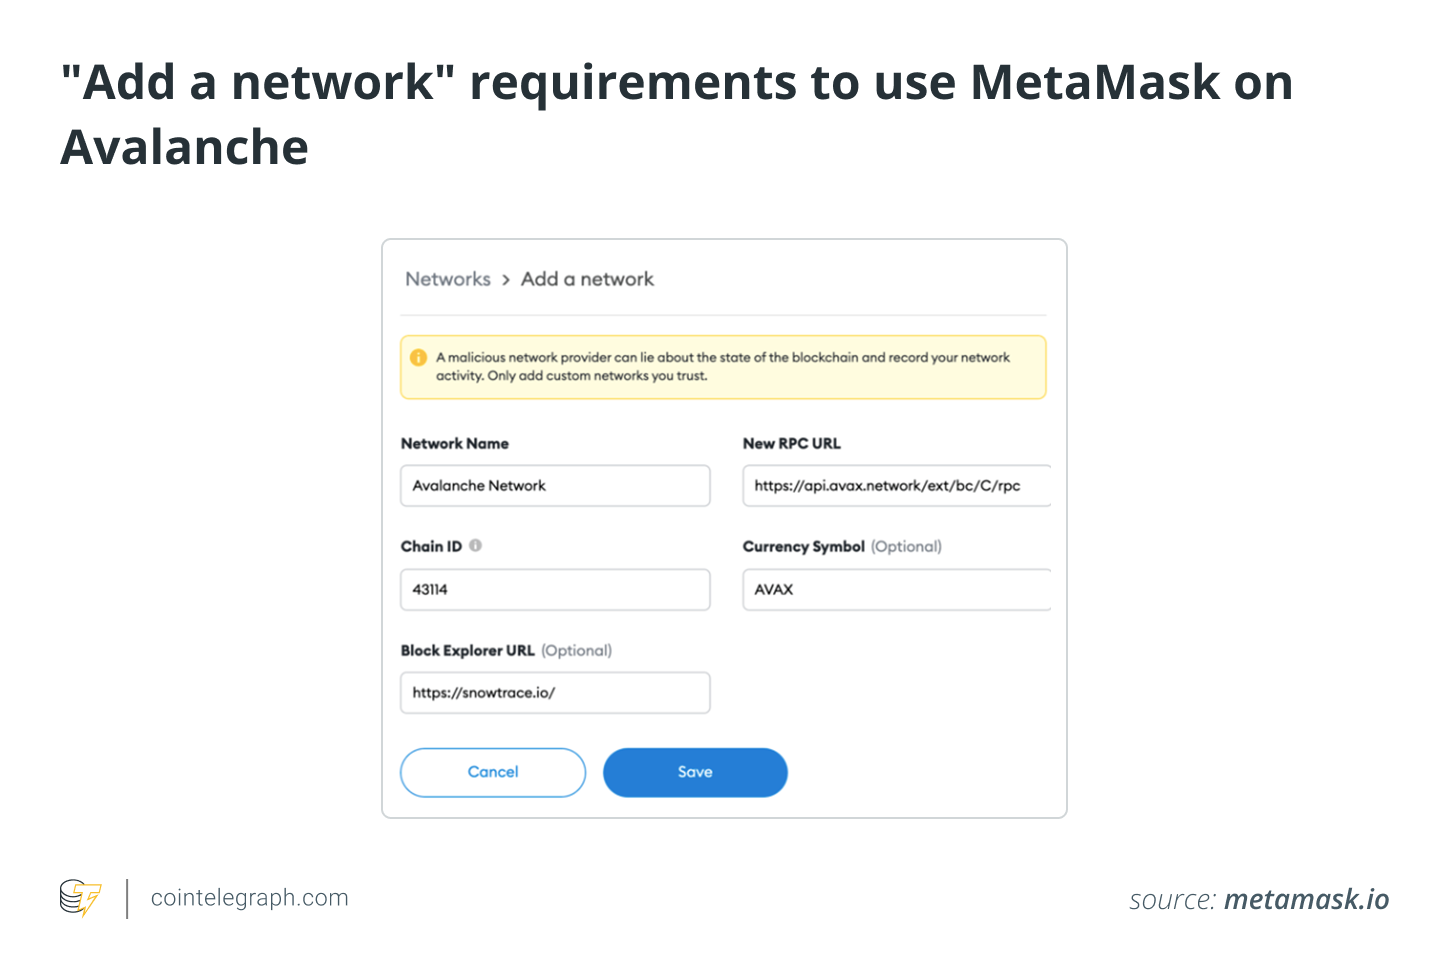
How do I add Avalanche to MetaMask?
To add Avalanche to MetaMask, follow these steps:
- Open MetaMask and navigate to the Networks page.
- Click “Add Network”.
- Fill in the following details for the Avalanche network:
- Network Name: Avalanche
- New RPC URL: https://api.avax.network/ext/bc/C/rpc
- ChainID: 43114
- Symbol (optional): AVAX
- Block Explorer URL (optional): https://cchain.explorer.avax.network/
- Click “Save” to add Avalanche to your MetaMask wallet.
-
Can I transfer AVAX between different chains?
Yes, you can transfer AVAX between different chains on the Avalanche network. The Avalanche ecosystem consists of multiple interconnected blockchains, including the X-Chain and the C-Chain. You can use MetaMask to interact with both chains and transfer AVAX between them.
-
Where can I find a step-by-step guide on adding Avalanche to MetaMask?
If you’re looking for a step-by-step guide on adding Avalanche to MetaMask, you can check out the guide provided by BeInCrypto. They have a detailed tutorial that walks you through the process of adding Avalanche to your MetaMask wallet.
-
Can I use MetaMask to store other cryptocurrencies besides AVAX?
Yes, MetaMask supports various cryptocurrencies besides AVAX. It is a multi-chain wallet that allows you to store and manage different tokens from different blockchains. You can add multiple networks to your MetaMask wallet and easily switch between them.
Step 4: Add Avalanche to MetaMask

In this step, we will guide you on how to add Avalanche to your MetaMask wallet. Adding Avalanche to MetaMask will enable you to easily transfer AVAX tokens between wallets and interact with the Avalanche x-chain through the MetaMask interface.
- Open the MetaMask extension in your web browser
- Click on the account icon and select “Settings”
- In the “Networks” tab, scroll down to the bottom and click on “Add Network”
- A form will appear where you can input the details of the Avalanche network:
| Network Name | Avalanche |
| New RPC URL | https://api.avax.network/ext/bc/C/rpc |
| Chain ID | 43114 |
| Symbol | AVAX |
| Block Explorer URL | https://cchain.explorer.avax.network/ |
- Fill in the form with the details mentioned above and click “Save”
- You have now successfully added the Avalanche network to your MetaMask wallet
- To access your AVAX tokens and interact with the Avalanche x-chain, make sure you select the Avalanche network in MetaMask
- You can switch between networks by clicking on the network name at the top of the MetaMask window
- Now you’re ready to use your MetaMask wallet to store AVAX tokens, transfer them between wallets, and interact with the Avalanche network
By adding Avalanche to MetaMask, you can easily manage your tokens on the AVAX chain, avoid unnecessary fees or commissions, and enjoy a seamless web3 experience across multiple networks and chains.
How to add Avalanche to MetaMask
Adding Avalanche to your MetaMask wallet allows you to access and interact with the Avalanche chain and networks directly through the MetaMask interface. This step-by-step guide will walk you through the process.
- Make sure you have MetaMask installed in your web browser. If you don’t have it yet, you can download it from metamask.io.
- Open the MetaMask extension and ensure you’re on the main page.
- Click on the dropdown menu next to the network name on the top of the MetaMask page. By default, it should be set to “Main Ethereum Network”.
- Scroll down and click on the “Custom RPC” option.
- In the “Custom RPC” settings, enter the following details:
| Network Name: | Avalanche Mainnet |
| New RPC URL: | https://api.avax.network/ext/bc/C/rpc |
| Chain ID: | 43114 |
| Symbol: | AVAX |
| Block Explorer URL: | https://cchain.explorer.avax.network/ |
Keep the rest of the fields as they are and click on the “Save” button.
If you’re using MetaMask mobile app:
- Go to “Settings”.
- Tap on “Networks” and then “Add Network”.
- Enter the same details as mentioned above.
- Tap on “Save”.
Once you’ve added Avalanche to your MetaMask wallet, you can start using it to interact with AVAX and other tokens on the Avalanche network. You can transfer AVAX to your MetaMask wallet, trade on the Avalanche DEX, and more.
Remember, while MetaMask is a secure wallet, it’s always recommended to store larger amounts of AVAX and other cryptocurrencies in hardware wallets for enhanced security.
That’s it! You’re now ready to explore the Avalanche network with MetaMask. If you need any further assistance, refer to the official MetaMask documentation or reach out to the Avalanche community for support.
Guide by BeInCrypto
Using Avalanche network with MetaMask

If you’re familiar with the Avalanche network and want to integrate it with your MetaMask wallet, this guide will walk you through the steps you need to take. By connecting your MetaMask wallet to the Avalanche network, you’ll be able to access and interact with the various applications and services on the network.
Step 1: Install MetaMask and set up your account
Before you can connect to the Avalanche network, you’ll need to have MetaMask installed on your browser. Visit the MetaMask website, download the extension or add-on, and set up your MetaMask account by creating a new wallet or importing an existing one.
Step 2: Connect MetaMask to the Avalanche network
Once you have MetaMask installed and your account set up, you can connect it to the Avalanche network. Follow these steps:
- Click on your MetaMask extension or add-on icon in your browser toolbar.
- In the dropdown menu, click on the network selection dropdown (usually showing “Main Ethereum Network”).
- Scroll down and click on “Custom RPC”.
- In the “New RPC URL” field, enter the Avalanche network’s RPC endpoint: https://api.avax.network/ext/bc/C/rpc.
- Enter a name for the network (e.g., Avalanche) and a symbol (e.g., AVAX).
- Click “Save” to add the Avalanche network to your MetaMask.
Step 3: Transferring assets through the Avalanche network
With MetaMask connected to the Avalanche network, you can now transfer assets such as AVAX tokens between your MetaMask wallet and other wallets or addresses on the Avalanche network. To send or receive assets:
- Click on the MetaMask extension or add-on icon in your browser toolbar to open the MetaMask popup.
- Click on the account you want to use for the transaction.
- Click on the “Send” button.
- Enter the recipient’s address and the amount you want to transfer.
- Click “Next” to review the transaction details.
- Confirm the transaction by clicking “Confirm” and follow any additional prompts.
Storing and managing multiple chains
MetaMask allows you to add and manage multiple chains, including the Avalanche network. You can easily switch between different networks by following these steps:
- Click on your MetaMask extension or add-on icon in your browser toolbar.
- In the dropdown menu, select the network you want to switch to.
Now that you’re familiar with using the Avalanche network with MetaMask, you can start exploring the various opportunities, applications, and services available on the Avalanche network.
Disclaimer
Note: Before transferring any funds or making any changes to your MetaMask wallet, it is important to be cautious and understand the risks involved. This guide is provided for informational purposes only and should not be considered financial or investment advice. Always do your own research and consult with a professional before making any financial decisions.
Transfer at your own risk: When adding Avalanche (AVAX) or any other chain to your MetaMask wallet, you will be interacting with a different blockchain network. While MetaMask is a trusted wallet provider, there is still a risk of potential hacks, scams, or technical issues.
Guide limitations: This guide is based on the information available at the time of writing and may become outdated in the future. Always refer to the official resources and documentation provided by MetaMask, Avalanche, or any other platform mentioned in this guide for the most up-to-date and accurate instructions.
Multiple wallets: This guide assumes that you already have an existing MetaMask wallet set up. It is important to note that adding Avalanche or any other x-chain to your MetaMask wallet will create a separate wallet within that specific chain. This means that you will have multiple wallets within your MetaMask account, each specific to a different chain.
Network fees and commissions: When interacting with different blockchain networks, such as Avalanche, there may be network fees and commissions involved in transactions. These fees can vary and may impact the amount of cryptocurrencies you are transferring. Always consider these fees when making transfers.
Storing funds on web3 wallets: It is important to understand that web3 wallets, including MetaMask, are considered hot wallets and their security can be compromised if proper precautions are not taken. Do not store large amounts of cryptocurrencies on web3 wallets and consider using hardware wallets or other more secure options for long-term storage.
Disclaimer source: Please note that this article is intended to provide general information only and should not be seen as professional financial advice. BeInCrypto is not responsible for any financial losses incurred. Please do your own research before making any investment decisions.
What is the difference between C-Chain and X-Chain on Avalanche?
The Avalanche network consists of several chains, including the C-Chain and X-Chain. Each chain serves a specific purpose and offers different functionalities. In this guide, we will explore the differences between the two chains and how they can be used with MetaMask.
C-Chain
The C-Chain, also known as the Contract Chain, is a smart contract chain on the Avalanche network. It supports the execution of smart contracts and allows developers to build decentralized applications (dApps) using the Ethereum Virtual Machine (EVM) environment.
With the C-Chain, users can interact with various dApps and deploy their own smart contracts. If you’re familiar with Ethereum and its ecosystem, you’ll find it easy to navigate the C-Chain as it shares many similarities with the Ethereum mainnet.
To use the C-Chain with MetaMask, you need to add the Avalanche network to your wallet. From there, you can connect to the C-Chain and start interacting with dApps, executing smart contracts, and conducting transactions using the AVAX token.
X-Chain
The X-Chain, also known as the Exchange Chain, is the default chain on Avalanche and serves as its primary network. It is optimized for fast and low-cost transactions, making it ideal for everyday transactions and transfers.
If you’re looking to transfer AVAX or other Avalanche assets quickly and with low fees, the X-Chain is the preferred choice. Similar to the C-Chain, you can add the Avalanche network to your MetaMask wallet and connect to the X-Chain to start using it for transactions.
Unlike the C-Chain, the X-Chain does not support smart contracts and dApps. Its main focus is on providing a seamless experience for transferring assets through the Avalanche network. If you’re primarily interested in storing and managing your AVAX tokens, the X-Chain is the chain to use.
Conclusion
In summary, the C-Chain and X-Chain on Avalanche offer different functionalities and cater to different user needs. The C-Chain is designed for smart contract execution and dApp development, while the X-Chain is optimized for fast and cost-effective asset transfers.
By adding the Avalanche network to your MetaMask wallet, you can easily switch between the two chains and leverage the unique features they offer. Whether you’re a developer or a regular user, having access to both chains expands your options on the Avalanche network.
Sending and receiving AVAX tokens

Once you have added Avalanche (AVAX) to your MetaMask wallet by following the steps mentioned in our guide on How to Add Avalanche to MetaMask, you can now send and receive AVAX tokens on the Avalanche network. This guide will walk you through the process.
Sending AVAX tokens:
- Open MetaMask and make sure you’re on the correct chain. You can switch between chains by clicking the network dropdown at the top of the MetaMask extension and selecting the desired network (X-Chain for Avalanche).
- Click on the “Send” button to initiate a transfer.
- Enter the recipient’s wallet address in the “To” field. Make sure to double-check the address to avoid any mistakes.
- Enter the amount of AVAX tokens you want to send in the “Amount” field.
- Adjust the gas fees (commissions) based on your preference. Higher fees will result in faster processing times.
- Review the transaction details and click “Confirm” to complete the transfer.
Receiving AVAX tokens:
- Open MetaMask and make sure you’re on the correct chain (X-Chain for Avalanche).
- Click on the “Receive” button to generate your wallet address.
- Copy the wallet address to your clipboard.
- Share the wallet address with the sender to receive AVAX tokens.
Remember to exercise caution when storing and transferring AVAX tokens. Make sure to double-check the recipient’s address before initiating any transfers. It’s always recommended to start with a small amount when testing new transactions on a new chain.
Frequently Asked Questions:
What is MetaMask?
MetaMask is a popular cryptocurrency wallet and browser extension that allows users to manage their Ethereum-based tokens and interact with decentralized applications (dApps) on the Ethereum network.
What is Avalanche?
Avalanche is a decentralized platform that aims to provide a highly scalable and efficient ecosystem for building decentralized applications (dApps) and blockchain solutions.
Why would I want to add Avalanche to MetaMask?
Adding Avalanche to MetaMask allows you to easily manage and interact with Avalanche-based tokens and decentralized applications (dApps) using the familiar MetaMask interface.
Can I use Avalanche with MetaMask on mobile devices?
Yes, you can use MetaMask with Avalanche on mobile devices. You can download the MetaMask mobile app and follow the same steps to add Avalanche to your network list.
Are there any fees associated with adding Avalanche to MetaMask?
No, adding Avalanche to MetaMask does not require any fees. However, when you interact with Avalanche-based dApps or perform transactions on the Avalanche network, you may incur transaction fees.
Is Avalanche compatible with other blockchain networks?
Avalanche is compatible with other blockchain networks through the use of cross-chain bridges. This allows for the transfer of assets and data between Avalanche and other supported networks, such as Ethereum.
Videos:
How to INSTALL Metamask Mobile Wallet | App Tutorial + Navigation


