
In today’s digital world, transactions utilizing cryptocurrencies have become more prominent than ever before. Among the various cryptocurrencies available, Ethereum (ETH) stands out as a versatile and widely-used digital currency. If you’re new to ETH or looking to explore its potential, MetaMask Mobile’s browser offers a convenient way to buy, send, and utilize ETH to its full potential.
So, what exactly is MetaMask Mobile’s browser? MetaMask Mobile is an extension of the popular MetaMask browser extension. With MetaMask Mobile’s browser, you have access to the world of Ethereum and decentralized applications (DApps) right from your smartphone.
Once you’re set up with MetaMask Mobile, you can easily buy ETH using various platforms such as a cryptocurrency exchange. After acquiring ETH, you can store them in your MetaMask wallet, which serves as your digital vault. Each ETH transaction is stored on the Ethereum blockchain, where thousands of computers (miners) verify and record the transaction. This decentralized approach ensures the security and transparency of your funds.
Having acquired ETH and stored them in your MetaMask wallet, you can now proceed with sending them to another Ethereum address. Simply input the recipient’s wallet address, select the total amount of ETH or tokens you wish to send, and click confirm. MetaMask Mobile’s browser will handle the transaction and provide you with a notification once it’s completed. It’s that simple!
Aside from sending and receiving ETH, MetaMask Mobile’s browser also allows you to explore various DApps and interact with the Ethereum network. Whether you want to browse decentralized marketplaces, play blockchain games, or manage your decentralized finance (DeFi) portfolios, MetaMask Mobile’s browser is where you can do it all.
That’s just a glimpse of what MetaMask Mobile’s browser has to offer. With its user-friendly interface and powerful web3 technology, you can navigate the Ethereum ecosystem with ease and confidence. Remember to exercise caution and do thorough research before engaging in any financial transactions. Seek advice from experts and always double-check the address you’re sending your funds to. Happy browsing!
- Section 1: Buying ETH on MetaMask
- Creating a MetaMask Wallet
- Funding Your MetaMask Wallet
- Purchasing ETH on MetaMask
- Section 2: Sending ETH with MetaMask Mobile
- Accessing Your Wallet on MetaMask Mobile
- Choosing a Recipient Address
- Sending ETH from MetaMask Mobile
- Section 3: Using MetaMask Mobile’s Browser
- Opening the Browser within MetaMask Mobile
- Navigating to Websites with MetaMask Mobile’s Browser
- Interacting with DApps through MetaMask Mobile’s Browser
- How do I find the coin that I just bought on MetaMask
- Section 4: Locating Your Purchased Coin
- Accessing Your Account History
- Frequently Asked Questions:
- What is MetaMask Mobile’s Browser?
- How do I buy Ethereum?
- What is the purpose of MetaMask Mobile’s Browser?
- How do I send Ethereum using MetaMask Mobile?
- Can I use MetaMask Mobile’s Browser on both iOS and Android?
- Is it safe to use MetaMask Mobile’s Browser?
- Video:
- How To Use MetaMask – Easy 2023 Tutorial
- How To Withdraw Metamask Crypto Into Your Bank Or Paypal Account – Quick and Easy!
- How To Create Ethereum Wallet with Metamask Using Browser – Step By Step Guide
Section 1: Buying ETH on MetaMask
To buy ETH on MetaMask, follow these step-by-step instructions:
- Select the MetaMask extension or app
- Go to the “Buy” section
- Select the platform or exchange where you want to buy ETH
- Follow the instructions provided by the platform or exchange to complete your purchase
- Once you have purchased ETH, it will be deposited to your MetaMask account
With your ETH in MetaMask, you can now use it for various purposes:
- Sending ETH to other addresses
- Initiating transactions on decentralized applications (dApps)
- Participating in ICOs or token sales
- Trading ETH for other cryptocurrencies or tokens
- Interacting with smart contracts
MetaMask also allows you to store and manage other tokens that are built on the Ethereum network. You can receive and send these tokens just like you would with ETH.
Creating a MetaMask Wallet
MetaMask is a popular cryptocurrency wallet that allows users to securely store, manage, and interact with their digital assets. Follow these steps to create your own MetaMask wallet:
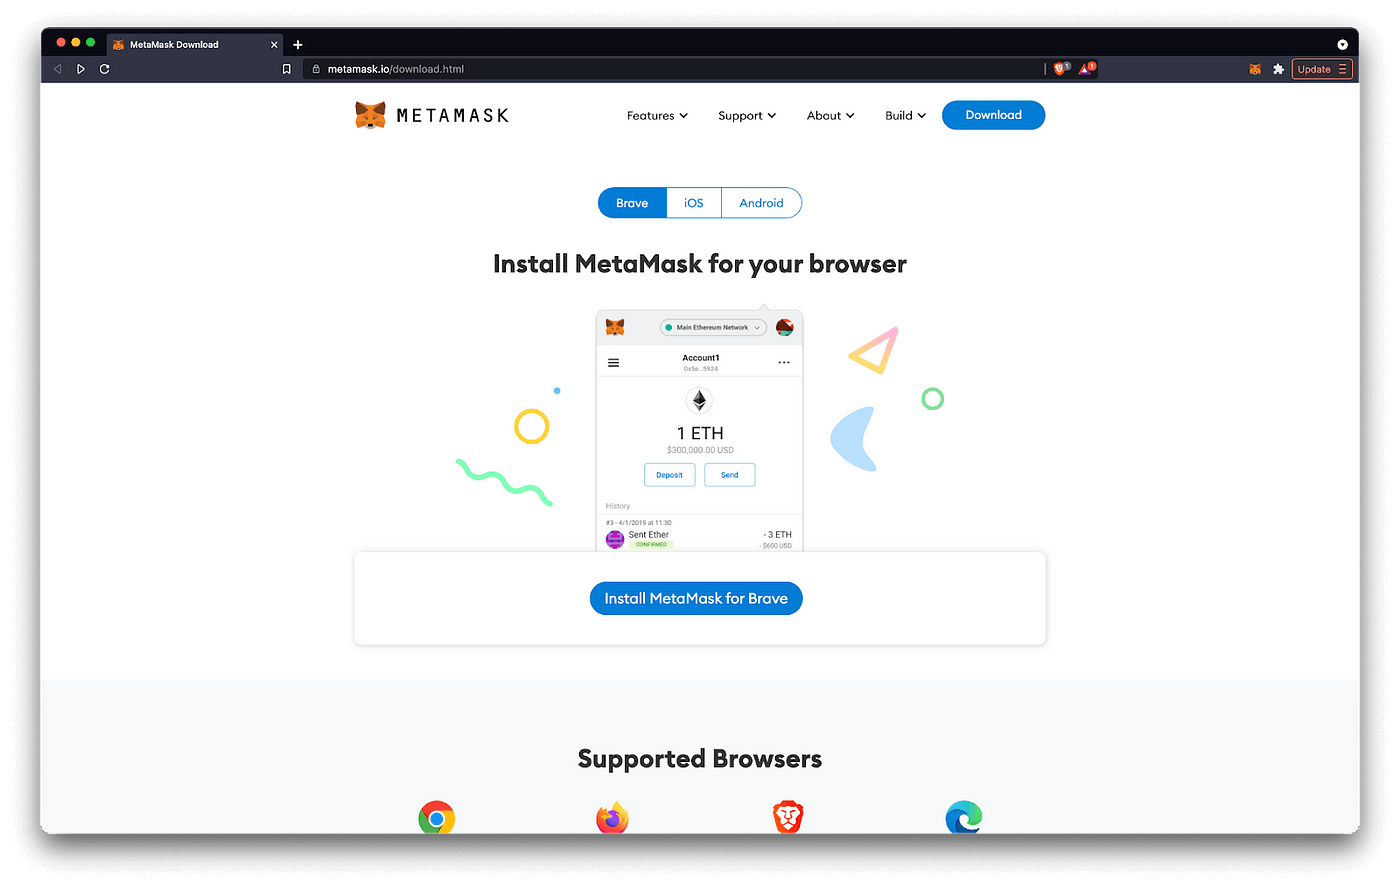
- Download and install the MetaMask mobile app from the Google Play Store or Apple App Store.
- Open the MetaMask app and tap on the “Get Started” button to begin the setup process.
- Create a new wallet by selecting the “Create a Wallet” option. Make sure to set a strong password and keep it safe.
- You will be presented with a 12-word seed phrase. Write down this phrase and keep it in a safe place. This seed phrase is important for recovering your wallet if you ever lose access to it.
- Confirm your seed phrase by selecting the words in the correct order. This ensures that you have written down the seed phrase correctly.
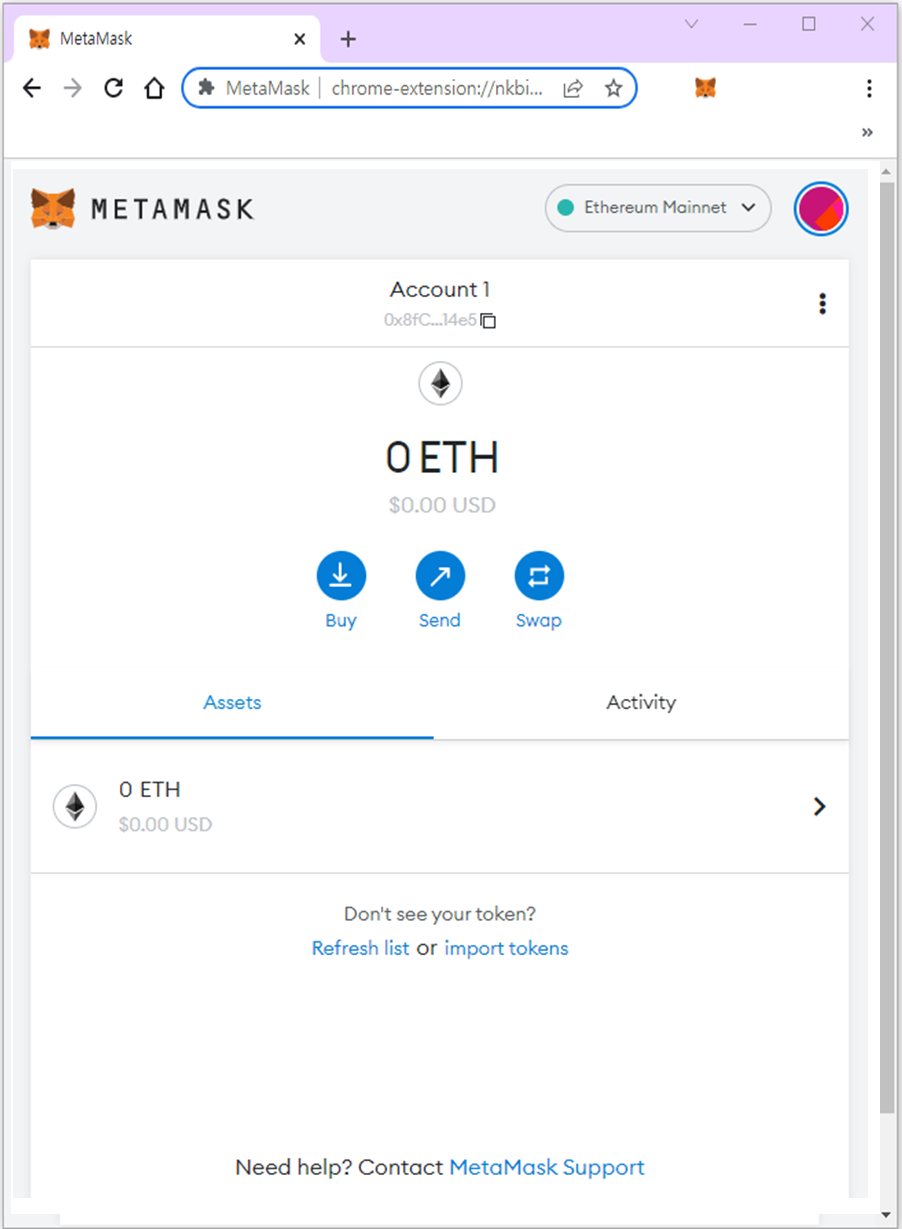
- Once your wallet is created, you will be taken to the wallet dashboard. Here, you will see your wallet address, which is a unique identifier for your wallet on the Ethereum blockchain.
- You can now add funds to your MetaMask wallet by using a cryptocurrency exchange or by receiving funds from another wallet. Simply provide your wallet address to the sender, and they can send funds directly to your wallet.
- MetaMask supports multiple networks and tokens, so you can manage various cryptocurrencies within the same wallet. You can switch between networks, like Ethereum Mainnet or test networks, by tapping on the network name at the top of the app.
- If you want to interact with decentralized applications (DApps) on the web, you can enable the MetaMask browser by tapping on the browser icon at the bottom of the app. This allows you to browse thousands of DApps and make transactions directly from your wallet.
- Having multiple accounts in MetaMask can be useful for different purposes. To create a new account, go to the wallet dashboard and tap on the account icon. From there, you can add a new account and switch between them as needed.
That’s it! You have successfully created a MetaMask wallet and are now ready to start exploring the world of decentralized finance and blockchain technology. If you have any questions or need further assistance, don’t hesitate to seek advice from the MetaMask support team or the vibrant online community of crypto enthusiasts.
Funding Your MetaMask Wallet
Once you’re browsing the web with MetaMask and have set up your wallet, the next step is to fund it with Ethereum (ETH) or other supported tokens. Having funds in your MetaMask wallet will allow you to make transactions, such as sending ETH or interacting with decentralized applications (dApps) and websites that support web3.
Here’s a step-by-step guide on how to fund your MetaMask wallet:
- Open the MetaMask app on your mobile device and select the desired wallet from the accounts you have created.
- Tap on the “Receive” button to view your wallet address. This is the address where you can receive ETH or other tokens.
- Copy your wallet address by tapping on it. You can also share it directly through various social media platforms or messaging apps.
- Go to your existing cryptocurrency wallet or exchange where you have ETH or tokens available.
- Initiate a transaction to send ETH or other tokens to your MetaMask wallet address. Make sure you double-check the address to avoid sending funds to the wrong address.
- Wait for the transaction to be confirmed on the blockchain. The confirmation time can vary depending on network congestion and the gas fees you paid for the transaction.
- Once the transaction is confirmed, you should see the funds in your MetaMask wallet.
Important advice: When copying your MetaMask wallet address, always double-check it to make sure you have copied the correct address. Sending funds to the wrong address can result in irreversible loss of funds.
Keep in mind that MetaMask supports multiple networks, and each network has its own set of accounts and balances. Make sure to select the correct network (Ethereum Mainnet, Ropsten Testnet, etc.) when sending funds or interacting with dApps.
In conclusion, funding your MetaMask wallet is a straightforward process that involves sending ETH or tokens to your wallet address. Double-check everything to ensure you’re sending funds to the correct address, and be mindful of the network you’re using to avoid any mishaps. That’s it! You’re now ready to explore the world of decentralized finance and enjoy the benefits of using MetaMask on your mobile device.
Purchasing ETH on MetaMask
If you want to buy ETH on MetaMask, follow these step-by-step instructions:
- Make sure you are connected to the correct network. The network selected should be the one where you want to purchase ETH.
- Click on the “Buy” button on the MetaMask interface.
- A new window will open, showing various options to purchase ETH. Select the option that best suits your needs and follow the instructions provided.
- Provide the total amount of ETH you want to purchase and enter your payment details. Make sure to double-check all the information before proceeding with the payment.
- Once the transaction is completed, you will see the purchased ETH in your MetaMask account balance.
- To view your ETH address, click on the MetaMask extension icon in your browser toolbar and then click on your account name.
- Your ETH address will be displayed under the “Your Accounts” section. You can copy this address and use it to receive ETH from another wallet or exchange.
- If you want to send ETH to another address, click on the “Send” button on the MetaMask interface.
- Enter the recipient’s ETH address, provide the amount of ETH you want to send, and double-check the transaction details.
- Click on the “Next” button to confirm the transaction.
- If prompted, confirm the transaction by paying the necessary gas fees.
- Once the transaction is confirmed and mined, the ETH will be sent to the recipient’s address.
It’s important to note that when purchasing and sending ETH, it’s always advisable to double-check all the information and transaction details to avoid any mistakes or losses of funds.
Having a basic understanding of how the Ethereum network and web3 transaction processing work can be beneficial if you’re new to MetaMask and the world of cryptocurrencies and tokens.
Section 2: Sending ETH with MetaMask Mobile
Once you have MetaMask Mobile installed and set up on your device, you can easily send ETH to another person or address using the app’s built-in functionality. Here’s a step-by-step guide on how to do it:
- Open the MetaMask Mobile app on your device and make sure you’re connected to the Ethereum network you want to use.
- Click on the “Accounts” button at the bottom of the screen to view your available accounts.
- Select the account from which you want to send funds.
- Now, click on the “Send” button located at the bottom of the screen.
- In the “To” field, enter the recipient’s ETH address. Make sure to double-check the address to avoid any mistakes.
- In the “Amount” field, enter the amount of ETH you want to send. You can also select from the predefined amounts.
- Choose the network fee that suits your needs and click on “Next.”
- Review the transaction details, including the total amount of ETH to be sent, fees, and estimated transaction time.
- If everything looks correct, click on the “Confirm” button.
- You will be prompted to enter your MetaMask Mobile PIN or use biometric authentication to confirm the transaction.
- Once confirmed, MetaMask Mobile will send the transaction to the Ethereum network for processing.
Keep in mind that the transaction will need to be confirmed and mined by the Ethereum network, which can take a few seconds to a few minutes depending on network congestion. You can view the status of your transaction in the app’s “Activity” tab.
MetaMask Mobile allows you to send not only ETH but also other ERC-20 tokens. To send tokens, follow the same steps as mentioned above, but instead of selecting ETH, choose the token you want to send from the dropdown menu.
Remember to always be cautious when sending funds and double-check the recipient’s address. The world of cryptocurrencies can be complex and scammers are prevalent even in legitimate platforms. If you’re unsure or need advice, consult trusted sources or communities.
Accessing Your Wallet on MetaMask Mobile
To access your wallet on MetaMask Mobile, you will need to have the MetaMask mobile app installed on your device. Once you have installed the app, open it and follow these steps:
- Open the MetaMask mobile app on your device.
- If you already have an existing MetaMask account, you will be prompted to import your account. Select “Import using seed phrase” and enter your seed phrase to restore your account. If you don’t have an account yet, you can create a new one by selecting “Create a Wallet”.
- After importing or creating your account, you will be taken to the main screen of the app. Here, you will see the balance of your account and the list of your connected networks.
- By default, MetaMask Mobile will be set to the Ethereum network. To switch to another network, tap on the network name at the top of the screen. You can select from various networks such as Binance Smart Chain, Polygon, and more.
- To access your wallet address, tap on the account avatar or the account name at the top of the screen. This will show you the list of all your accounts in MetaMask Mobile.
Once you have accessed your wallet on MetaMask Mobile, you can start browsing the web with the built-in browser and interact with decentralized applications (dApps). You can also send and receive ETH and other tokens using the wallet’s functionality.
It’s important to note that when browsing the web using MetaMask Mobile’s browser, you are using a web3-enabled browser. This means that you can interact with websites and dApps that are built on decentralized technologies.
If you want to send funds to another address, you can do so by selecting the “Send” option on the main screen of the app. Enter the recipient’s address, the amount of ETH or tokens you want to send, and confirm the transaction.
Having access to your wallet on MetaMask Mobile allows you to manage your funds and interact with the decentralized world wherever you are. With MetaMask Mobile, you can use the web3 capabilities of your mobile device to browse and transact with the thousands of dApps and tokens that are available in the blockchain ecosystem.
Choosing a Recipient Address

When you want to send ETH or other tokens, you’ll need to choose a recipient address. The recipient address is the destination where you want to send your funds.
There are a few options for selecting a recipient address:
- If you’re sending ETH to someone you know, you can ask them to provide their Ethereum wallet address. This address is usually a string of alphanumeric characters and looks something like this: 0xAbC123EfG456hiJ789KLm1n0pQrStuVwxYz. Make sure you double-check the address to avoid any mistakes.
- If you’re sending funds to another account that you own, you can use one of your own Ethereum addresses as the recipient address.
- If you’re browsing a decentralized application (dApp) or a website that supports MetaMask, you might see an option to select a recipient address directly from the interface. In this case, you can select the address that’s provided.
It’s important to note that Ethereum addresses are case-sensitive, so make sure you enter the address exactly as it’s provided. Having one incorrect character in the address can result in your funds being sent to the wrong address, with no way to recover them.
If you’re using MetaMask with multiple Ethereum networks, make sure you select the appropriate network before choosing a recipient address. Different networks have different addresses, so selecting the wrong one can result in your funds being sent to an address that doesn’t exist on that network.
If you’re new to the world of Ethereum and cryptocurrencies, it’s always a good idea to double-check the recipient address with the person or platform you’re sending funds to. Even experienced users can make mistakes, so it never hurts to get advice or clarification if you’re unsure.
Sending ETH from MetaMask Mobile
When it comes to sending ETH or tokens from your MetaMask Mobile wallet, you can easily do it within a few steps. Here’s how:
- Open the MetaMask Mobile app and make sure you’re on the correct network. MetaMask Mobile supports multiple networks, such as Ethereum Mainnet, Ropsten Testnet, and others.
- If you have multiple accounts, select the account from which you want to send the ETH or tokens.
- In the MetaMask Mobile app’s browser, go to the website or the DApp where you want to send the funds. Remember to exercise caution and only interact with trusted websites and DApps.
- Once you’re on the website or DApp, select the option to send ETH or tokens.
- Enter the recipient’s address in the provided field. Make sure to double-check the address to avoid any mistakes.
- Specify the amount of ETH or tokens you wish to send.
- Review the transaction details carefully. Ensure that the recipient’s address and the amount you entered are correct.
- Verify that the gas fee for the transaction is reasonable. Gas fees are required for Ethereum transactions and can vary depending on the network’s congestion at the time.
- If everything looks good, confirm the transaction. MetaMask Mobile will prompt you to sign the transaction using your wallet’s private key.
- After the transaction is signed, MetaMask Mobile will broadcast it to the Ethereum network for it to be mined.
- Once the transaction is mined and confirmed, the recipient will receive the ETH or tokens you sent.
Please note that it’s crucial to exercise caution when sending funds, as transactions on the blockchain are irreversible. Always double-check the recipient’s address and the transaction details before confirming. If you’re unsure about anything, it’s best to seek advice or use a test network to practice.
With MetaMask Mobile, sending ETH or tokens from your wallet is a straightforward process, allowing you to effortlessly participate in the decentralized world of thousands of DApps and websites.
Section 3: Using MetaMask Mobile’s Browser
MetaMask Mobile’s browser is a powerful tool that allows you to browse the web and interact with decentralized applications (dApps) in a secure and decentralized manner. Here are the steps to use MetaMask Mobile’s browser:
- Open your MetaMask Mobile app and navigate to the “Browser” tab.
- You will see the address bar at the top, where you can enter the URL of the dApp or website you want to visit.
- Select the address bar and enter the URL of the dApp or website you want to visit.
- Once you enter the URL, MetaMask Mobile’s browser will load the webpage, and you can start browsing.
If you come across a dApp that requires you to connect your wallet, you can do so by following these steps:
- Tap on the MetaMask Mobile extension icon at the bottom of the screen.
- You will be prompted to select an Ethereum address to connect. Select the address you want to use.
- Once you select the address, MetaMask Mobile will automatically connect your wallet to the dApp.
That’s it! Now you can browse and interact with dApps using MetaMask Mobile’s browser. If you want to send tokens or perform any other transactions, you can do so directly from the browser.
Important advice: When sending funds or interacting with dApps, always make sure you are on the correct website and double-check the address before proceeding with any transactions. Be aware of phishing attempts and only use trusted dApps.
MetaMask Mobile’s browser uses the web3 interface to interact with the Ethereum network. This means that you can browse dApps, send transactions, and manage your accounts and funds directly within the browser, without having to switch to another app or wallet.
In the world of blockchain, every transaction needs to be mined and confirmed by the network. This can sometimes take a few seconds or even minutes, depending on network congestion. Be patient and wait for the transaction to be confirmed before assuming it is complete.
Opening the Browser within MetaMask Mobile

To open the built-in browser within MetaMask Mobile, follow these steps:
- Ensure that you have installed and set up MetaMask Mobile on your device.
- Open the MetaMask Mobile app and make sure you are logged in to your MetaMask account.
- At the bottom of the screen, you will see a toolbar with different options. Tap on the “Browser” icon to open the browser.
- Once the browser is opened, you can start browsing the web just like you would with any other browser.
- You can enter a URL in the address bar to navigate to a specific website or use the search bar to look for something on the internet.
- If you come across any web pages that require you to connect your MetaMask account, you will see a pop-up notification from MetaMask. You can choose to connect your account to such websites if you trust them.
- While browsing, you can also interact with decentralized applications (dApps) that are built on the Ethereum blockchain. Some dApps may ask for your permission to access your MetaMask account, so make sure to carefully review and approve only trustworthy requests.
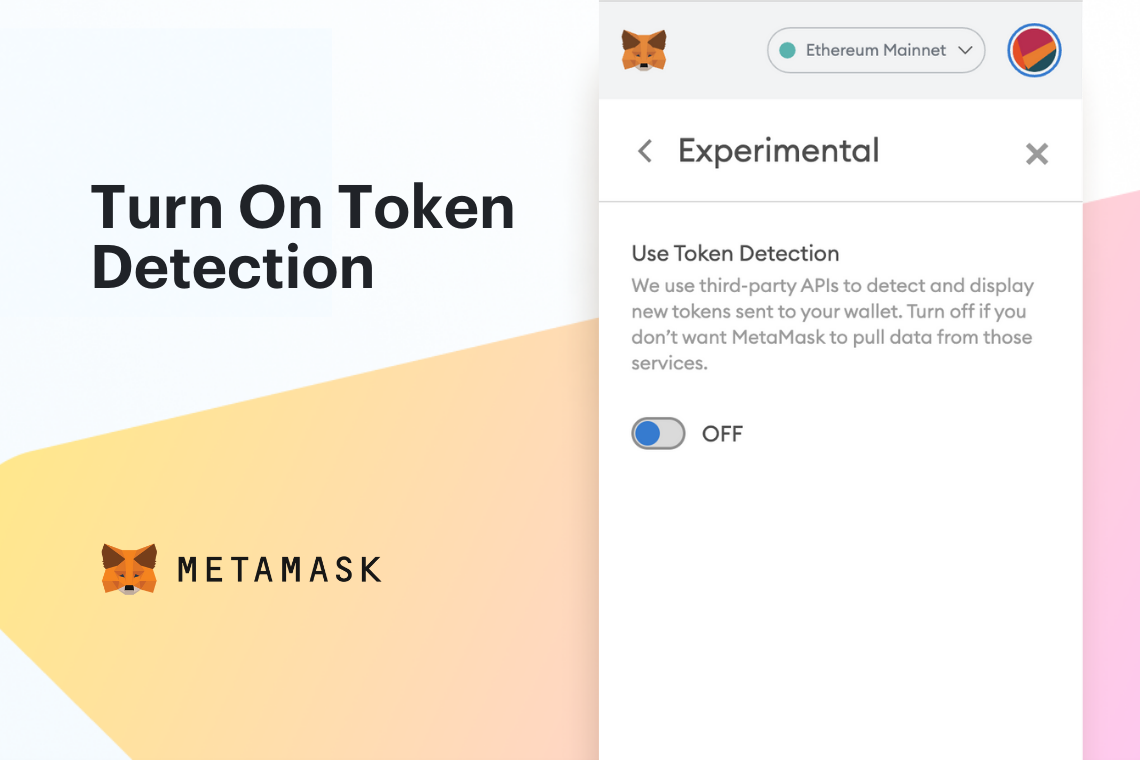
- If you come across any tokens or transactions on a website, MetaMask will detect them and provide you with options to send or receive those tokens or view the details of the transactions.
By opening the browser within MetaMask Mobile, you can conveniently access the world of Ethereum and seamlessly interact with decentralized applications and websites that are integrated with Web3.
Navigating to Websites with MetaMask Mobile’s Browser
MetaMask Mobile’s browser allows you to visit websites that are compatible with Ethereum and Web3. This feature is useful for interacting with decentralized applications (dApps) and accessing various Ethereum services.
Once you have installed and setup MetaMask Mobile, follow these steps to navigate to websites with the built-in browser:
- Open the MetaMask app on your mobile device.
- Select the account where you have funds and tokens.
- Tap on the “Browser” tab at the bottom of the screen.
- Use the search bar to enter the website address you want to visit.
- Tap on the website link in the search results to open it in the browser.
While browsing websites with MetaMask Mobile, you can interact with Ethereum-based features and services. For example, you can connect your wallet to dApps, make transactions, and even browse decentralized exchanges where you can trade your tokens.
If you come across a website that requires you to connect your MetaMask wallet, you will see a pop-up notification asking for your permission. Review the website and its features before approving the connection.
It is important to exercise caution while browsing the Ethereum ecosystem. Ensure that you visit only trusted and verified websites to avoid potential scams and security risks.
By using MetaMask Mobile’s browser, you can explore the thousands of Ethereum-based websites and dApps available in the decentralized world. Just select the website you want to visit, and MetaMask will handle the rest!
Interacting with DApps through MetaMask Mobile’s Browser
MetaMask Mobile’s browser is a powerful tool that allows you to seamlessly interact with decentralized applications, or DApps, right from your mobile device. With this browser, you can access websites that are built on blockchain technology and perform various actions such as sending and receiving tokens, interacting with smart contracts, and participating in decentralized finance (DeFi) activities.
When you open MetaMask Mobile’s browser, you will have access to various features and functionalities that enable you to navigate the world of DApps easily. Here’s a step-by-step guide on how to interact with DApps using MetaMask Mobile:
- Launch the MetaMask Mobile app and make sure you have set up and logged into your MetaMask account.
- In the app, tap on the browser icon located at the bottom of the screen. This will open the browser.
- You can now browse and visit websites that are DApp-enabled. MetaMask Mobile’s browser allows you to visit popular DApps such as Uniswap, OpenSea, and many others.
- Once you’re on a DApp’s website, you can connect your MetaMask account by clicking on the MetaMask icon on the webpage. This will open a popup where you can select the desired MetaMask account to connect.
- After connecting your MetaMask account, you can interact with the DApp by selecting different options or functionalities provided by the website. This can include actions like sending tokens, approving transactions, or buying and selling digital assets.
- When executing transactions or interacting with smart contracts, you’ll be prompted to review and confirm the details of the transaction. MetaMask Mobile will provide you with all the necessary information, including gas fees, before you proceed.
- If you’ve interacted with DApps on MetaMask desktop, you’ll find that the process is quite similar on MetaMask Mobile’s browser. In fact, MetaMask Mobile’s browser is designed to provide a seamless and consistent user experience across all MetaMask platforms.
That’s it! You’re now able to browse and interact with DApps using MetaMask Mobile’s browser. Enjoy exploring the wide world of blockchain-based applications and make the most out of your digital assets!
One piece of advice: always ensure you’re visiting legitimate and trusted DApps. The decentralized nature of blockchain technology means that there are thousands of DApps out there, and not all of them are safe. Stick to well-known DApps with positive reputations to ensure the security of your funds and transactions.
How do I find the coin that I just bought on MetaMask

If you want to find the coin that you just bought on MetaMask, you will need to follow these steps:
- Open the MetaMask mobile app.
- Make sure you are on the correct network. MetaMask supports multiple networks, so it’s essential to select the one where you made the purchase.
- Tap on the Menu button (three horizontal lines) in the top-left corner of the app.
- Select “Wallet” from the menu.
- You will see a list of your accounts. Tap on the account where you made the purchase.
- Scroll down to the “Tokens” section. Here, you will find a list of all the tokens you hold in that account.
- If you can’t find the coin you’re looking for, you may need to add it manually. Tap on the “Add Token” button.
- Enter the contract address of the token and tap on “Add”. You can find the contract address on the token’s website or through a reliable token explorer.
- Once the token is added, you should see it listed in your MetaMask wallet.
That’s it! Now you can easily find the coin that you just bought on MetaMask and keep track of your tokens. It’s important to note that not all tokens will be automatically displayed in MetaMask. You may need to add them manually using the token’s contract address.
If you’re having trouble finding your coins or have any other issues related to MetaMask, it’s a good idea to seek advice from the MetaMask support or consult the MetaMask community. The world of cryptocurrencies can be complex, and with thousands of tokens in total, it’s essential to stay informed and navigate the space with caution.
Section 4: Locating Your Purchased Coin
After purchasing your desired coin, you will need to locate the address where your coins are stored. Here’s how you can find it:
- Open MetaMask mobile’s browser by selecting the three dots icon in the bottom navigation bar and then selecting “Browser”.
- In the browsing tab, enter the web3 address you want to interact with.
- Once you are on the desired web3 page, look for the “Accounts” section.
- In the “Accounts” section, you will see the address associated with your MetaMask wallet.
Now that you have located your coin’s address, you can take several actions:
- Sending Tokens: If you want to send tokens to another address, you can use your MetaMask wallet. Simply enter the recipient’s address and the amount of tokens you want to send.
- Viewing Transactions: You can view your transaction history by selecting the “Transactions” tab in the MetaMask mobile app. This will show you a list of all your past transactions.
It’s important to note that each coin may have different functionalities and networks. Make sure you familiarize yourself with the specific coin you purchased to fully utilize its features. If you’re having trouble locating your purchased coin or need advice, there are thousands of online communities and forums where you can seek help from experienced users in the crypto world.
Remember, cryptocurrencies like ETH are mined and have their own networks. Make sure you select the correct network when interacting with your coin to avoid any complications. That’s it! You’re ready to explore the world of crypto and make transactions with your purchased coins.
Accessing Your Account History

Once you have set up your MetaMask account and have started using it to send and receive ETH and other tokens, you may want to access your account history to keep track of your transactions. MetaMask makes it easy to view your account history and see details about each transaction.
To access your account history, follow these steps:
- Open MetaMask by clicking on the MetaMask extension in your browser toolbar.
- Select the account whose history you want to view. If you have multiple accounts, make sure you choose the correct one.
- Click on the “Activity” tab at the bottom of the MetaMask window.
Once you’re in the account history section, you will see a list of all the transactions that have occurred with the selected account. This includes both incoming and outgoing transactions, as well as any token transfers.
If you want to see more details about a specific transaction, click on it to expand the view. Here, you can see the transaction hash, the address of the sender or recipient, the amount of ETH or tokens involved, the transaction status, and the date and time it was mined.
You can also filter the account history by selecting different options from the dropdown menus at the top of the page. For example, you can choose to only view incoming or outgoing transactions, or filter by specific tokens if you have multiple tokens in your account.
Having access to your account history is useful for keeping track of your funds and monitoring your transactions. It allows you to see the total amount of ETH and tokens you have sent or received, and provides an overview of your activity in the Ethereum network.
Remember that MetaMask supports multiple Ethereum networks, so make sure you select the correct network from the dropdown menu if you want to view transactions on a different network, such as the Ethereum Testnet or a custom network.
If you’re new to the world of Web3 and have never used MetaMask before, it’s a good idea to familiarize yourself with the basic concepts and read some guides or seek advice from experienced users. Accounts and transactions in Ethereum work differently than traditional banking systems, so it’s important to understand the mechanisms and take the necessary precautions to keep your funds safe.
Frequently Asked Questions:
What is MetaMask Mobile’s Browser?
MetaMask Mobile’s Browser is a mobile application that allows users to access and interact with decentralized applications (dApps) on the Ethereum blockchain.
How do I buy Ethereum?
To buy Ethereum, you can use various cryptocurrency exchanges such as Coinbase, Binance, or Kraken. You will need to create an account, verify your identity, and then you can purchase Ethereum using your preferred payment method.
What is the purpose of MetaMask Mobile’s Browser?
The purpose of MetaMask Mobile’s Browser is to enable users to browse and interact with dApps on their mobile devices. It provides a secure and convenient way to access decentralized applications on the Ethereum blockchain.
How do I send Ethereum using MetaMask Mobile?
To send Ethereum using MetaMask Mobile, you first need to have Ethereum in your MetaMask wallet. Then, open the MetaMask app, select the “Send” option, enter the recipient’s address, specify the amount of Ethereum you want to send, and confirm the transaction.
Can I use MetaMask Mobile’s Browser on both iOS and Android?
Yes, MetaMask Mobile’s Browser is available for both iOS and Android devices. You can download the app from the App Store or Google Play Store and start using it to access dApps on the Ethereum blockchain.
Is it safe to use MetaMask Mobile’s Browser?
Yes, MetaMask Mobile’s Browser is designed to provide a secure browsing experience. It utilizes various security measures, including encryption and private key storage, to protect your digital assets and personal information from unauthorized access.
Video:
How To Use MetaMask – Easy 2023 Tutorial
How To Withdraw Metamask Crypto Into Your Bank Or Paypal Account – Quick and Easy!
How To Create Ethereum Wallet with Metamask Using Browser – Step By Step Guide


