Using cryptocurrencies has become increasingly popular, and one of the most common methods of acquiring them is through exchanges. Coinbase is a widely used exchange platform that allows users to purchase, sell, and store various digital currencies. On the other hand, MetaMask is a popular web3 wallet that allows users to interact with decentralized applications (dApps) on the Ethereum blockchain.
If you’re looking to transfer your digital assets from Coinbase to MetaMask, this step-by-step guide will walk you through the process. First, ensure that you have wallets set up on both platforms. Coinbase will be used to purchase the cryptocurrencies, while MetaMask will be used to store and interact with them.
Once you have both wallets set up, follow these steps to complete the transfer:
- Step 1: Sign in to your Coinbase account and navigate to the “Wallets” section.
- Step 2: Click on the cryptocurrency you wish to transfer. Coinbase supports a variety of digital currencies such as Bitcoin, Ethereum, Litecoin, and more.
- Step 3: Click on the “Send” button, which is usually located next to the “Receive” button.
- Step 4: Enter the recipient’s MetaMask address. This is the address of your MetaMask wallet.
- Step 5: Specify the amount you want to transfer and review the transaction details.
- Step 6: Click on the “Continue” button to proceed with the transfer.
- Step 7: Coinbase may require you to complete a verification step for security purposes.
- Step 8: Once the transfer is completed, your cryptocurrency will appear in your MetaMask wallet.
It is important to note that transferring cryptocurrencies from Coinbase to MetaMask will incur a network transaction fee. This fee is required to process and validate the transaction on the blockchain. Additionally, it is recommended to backup your MetaMask wallet by downloading the seed phrase or private key. This will ensure that you can access your funds even if something happens to your device.
In conclusion, transferring cryptocurrencies from Coinbase to MetaMask is a straightforward process that can be completed using a few simple steps. By taking advantage of both platforms, users can enjoy the full benefits of decentralized applications and have full control over their digital assets.
- Step 1: Select the Currency
- Login to Coinbase
- Navigate to the Accounts Tab
- Choose the Cryptocurrency you Want to Send
- Step 2: Copy your MetaMask Wallet Address
- Install and Open the MetaMask Extension
- Create or Import a Wallet
- Copy the Wallet Address
- Step 3: Go back to Coinbase and Initiate the Transfer
- Go to the Send/Withdraw Section
- Paste the MetaMask Wallet Address
- Specify the Amount and Confirm the Transfer
- Step 4: Verify the Transaction on MetaMask
- Frequently Asked Questions:
- What is Coinbase?
- What is MetaMask?
- Can I transfer cryptocurrency from Coinbase to MetaMask?
- How do I send crypto from Coinbase to MetaMask?
- Are there any fees for transferring crypto from Coinbase to MetaMask?
- How long does it take to transfer crypto from Coinbase to MetaMask?
- Video:
- How To Send AVAX From Coinbase To MetaMask
Step 1: Select the Currency

The first step in sending crypto from Coinbase to MetaMask is to select the currency you want to send. Coinbase supports a wide range of cryptocurrencies, so make sure you have the correct currency selected.
To select the currency, follow these steps:
- Log in to your Coinbase account.
- Once logged in, navigate to the “Accounts” tab.
- Scroll down and find the wallet where your chosen cryptocurrency is stored.
- Click on the wallet to open it.
Note: If you don’t have the currency you want to send in your Coinbase wallet, you can purchase it using Coinbase’s buying method.
Once you have selected the correct wallet, you can proceed to the next step.
Login to Coinbase

In order to send cryptocurrency from Coinbase to MetaMask, you will first need to log into your Coinbase account. Follow the steps below to login:
- Visit the Coinbase website by typing www.coinbase.com into your preferred web browser.
- Click on the “Login” button located in the top-right corner of the homepage.
- Enter your email address and password associated with your Coinbase account.
- Click the “Sign In” button to complete the login process.
Once you are logged in, you will have full access to your Coinbase account and can proceed with the next steps to send your cryptocurrencies to MetaMask.
Navigate to the Accounts Tab

To send crypto from Coinbase to MetaMask, you need to first navigate to the Accounts tab on your Coinbase account. This tab displays a list of all the cryptocurrencies you currently own in your Coinbase wallet. You can download, backup, purchase, and manage your crypto assets from this tab.
In order to send your crypto assets to MetaMask, you need to have a full understanding of the process. MetaMask is a wallet that allows users to store and manage their cryptocurrencies with complete control. It also offers the advantage of being able to interact with decentralized applications (DApps) across different blockchains and cryptocurrencies.
- First, make sure you have both a Coinbase and a MetaMask wallet set up. If you don’t have a MetaMask wallet yet, you can download the MetaMask extension for your web browser.
- Once you have both wallets set up, navigate to the Accounts tab on your Coinbase account.
- In the Accounts tab, you will see a list of all the cryptocurrencies you own. Find the cryptocurrency you want to send to your MetaMask wallet and click on it.
- After clicking on the cryptocurrency, you will be taken to a page that shows the details of that particular currency. Look for the “Send” option and click on it.
- Next, you will be prompted to provide the recipient’s address. This is where you need to enter your MetaMask wallet address. Make sure to double-check the address to ensure that it is correct.
- Once you have entered the MetaMask wallet address, you can choose the amount of the cryptocurrency you want to send. You can either enter the amount manually or use the available options, such as “Max” to send the maximum amount.
- Review the transaction details carefully to ensure everything is correct. Once you have reviewed the details, click on the “Send” button.
- At this point, Coinbase will ask you to confirm the transaction. Follow the instructions provided and confirm the transaction.
- After the confirmation, the transaction will be sent to the blockchain for processing. This process may take some time, depending on the network congestion and the cryptocurrency you are sending. Once the transaction is completed, you will be able to see it in your MetaMask wallet.
It’s important to note that when sending cryptocurrencies from Coinbase to MetaMask, you should always double-check the recipient’s address and transaction details to ensure a successful transfer. Using a third-party method like MetaMask to manage your cryptocurrencies adds an extra layer of security and control to your assets.
Choose the Cryptocurrency you Want to Send

Once you have completed the steps to set up your MetaMask wallet and connect it to Coinbase, you can proceed to sending cryptocurrency from Coinbase to MetaMask. The first step in this process is to choose the cryptocurrency you want to send.
Coinbase supports a wide range of cryptocurrencies, including Bitcoin (BTC), Ethereum (ETH), Litecoin (LTC), and many others. To choose the cryptocurrency you want to send:
- Go to your Coinbase account and navigate to the Accounts page.
- Locate the cryptocurrency you want to send in your Coinbase wallet.
- Click on the cryptocurrency to select it.
It’s important to note that each cryptocurrency has its own network and transaction fees, so make sure to check the fees associated with the specific cryptocurrency you are planning to send.
Once you have selected the cryptocurrency, you can proceed to the next step, which involves entering the recipient’s MetaMask address and completing the transaction.
Step 2: Copy your MetaMask Wallet Address

Before sending cryptocurrency from your Coinbase account to your MetaMask wallet, you’ll need to copy your MetaMask wallet address.
- First, download the MetaMask extension for your browser and create a new wallet by following the necessary steps provided.
- Once you have completed the wallet creation process, you will be presented with a wallet address. This address is unique to your wallet and serves as the destination for your crypto funds.
- To copy your MetaMask wallet address, locate the address field within the MetaMask extension. It is usually found below the account name.
- Click on the address to copy it to your clipboard. You can also click on the copy icon next to the address for the same purpose.
- Take advantage of the backup seed words provided by MetaMask. These words can be used to restore your wallet in case of loss or for transferring to a different device. Make sure to store them securely.
By copying your MetaMask wallet address, you’re ready to proceed to the next step and send your desired cryptocurrency from Coinbase to your MetaMask wallet.
Install and Open the MetaMask Extension
To send crypto from Coinbase to MetaMask, you will need to have the MetaMask extension installed on your web browser. Follow these steps to install and open the extension:
- Open your web browser and go to the MetaMask website.
- Click on the “Download” button to download the MetaMask extension.
- Once the download is complete, click on the downloaded file to start the installation process.
- Follow the installation prompts to complete the installation.
- After the installation is complete, click on the MetaMask icon in your browser’s toolbar to open the extension.
- If you are opening MetaMask for the first time, you will be prompted to create a new account and set up a password. Make sure to create a strong password and securely backup your seed phrase, as it is the only way to recover access to your wallet if you forget your password.
- If you already have a MetaMask account, you can click on the “Restore from seed phrase” option to import your existing wallet using the backup seed phrase. Enter your seed phrase and set up a new password.
Once you have installed and opened the MetaMask extension, you are ready to proceed with the next steps to send crypto from Coinbase to MetaMask.
Create or Import a Wallet
If you are new to cryptocurrencies, the first step is to create a wallet to securely store your digital assets. If you already have a wallet, you can skip to the next section.
There are several options available for creating or importing a wallet. One popular option is to use MetaMask, a browser extension that allows you to access decentralized applications (dApps) and manage your digital currencies.
- First, you need to install the MetaMask extension for your browser. It is available for Chrome, Firefox, Brave, and Edge. You can download and install it from the official MetaMask website or from your browser’s extension store.
- Once the extension is installed, you can click on the MetaMask icon in your browser’s toolbar to open the wallet interface.
- When you open MetaMask for the first time, you will be prompted to create a new wallet or import an existing one.
- To create a new wallet, click on the “Create a Wallet” option. You will be asked to set a strong password for your wallet. Make sure to choose a password that is unique and difficult to guess.
- If you already have a wallet that you want to import, you can click on the “Import Wallet” option. MetaMask supports importing wallets using a seed phrase or private key.
- Once you have completed the wallet creation or import process, you will have a full-featured wallet with a unique address where you can store and manage your cryptocurrencies.
It is important to note that MetaMask is a non-custodial wallet, which means that you have full control over your private keys and funds. This is different from centralized exchange wallets, where you trust a third party to hold and secure your assets.
When creating or importing a wallet, it is highly recommended to backup your seed phrase or private key. This will allow you to recover your wallet if you ever lose access to your MetaMask account. Make sure to store your backup in a safe place and never share it with anyone.
Now that you have your MetaMask wallet set up, you can take advantage of its features to securely send and receive cryptocurrencies, interact with dApps, and explore the world of decentralized finance.
Copy the Wallet Address
Once you have completed the previous steps and have your MetaMask wallet set up and connected to Coinbase, you are ready to copy the wallet address.
To copy the wallet address, follow these steps:
- Open your MetaMask wallet extension by clicking on the MetaMask icon in your browser.
- In the MetaMask wallet, locate and click on the “Account Details” button. This button is usually represented by three dots or three lines.
- A dropdown menu will appear. Select the “Copy Address to Clipboard” option.
By copying the wallet address, you will have a backup of your MetaMask wallet address. This is important as it allows you to easily share your wallet address with others when needed.
Having a backup of your wallet address also gives you the advantage of being able to access your wallet from different devices or wallets. If, for any reason, you need to access your funds using a different wallet, you can simply paste your wallet address and complete the necessary steps to gain full control of your cryptocurrencies.
It is important to be cautious when sharing your wallet address with third parties. Cryptocurrencies are highly valuable and transactions cannot be reversed. Be sure to double-check the address before sharing it and only share it with trusted individuals or platforms.
Step 3: Go back to Coinbase and Initiate the Transfer

Now that you have your MetaMask wallet set up and ready, you can go back to your Coinbase account to initiate the transfer of your purchased cryptocurrencies.
- Open Coinbase and log into your account.
- Head over to the “Accounts” page.
- Look for the cryptocurrency you want to transfer to your MetaMask wallet. It should appear in the list of your wallets on Coinbase.
- Click on the “Send” or “Withdraw” button next to the cryptocurrency you wish to transfer.
- A popup window will appear, asking for the recipient’s address. This is where you will enter your MetaMask wallet address.
- Go back to your MetaMask wallet extension or app and copy your wallet address.
- Return to the Coinbase window and paste your MetaMask wallet address in the recipient’s address field.
- Next, verify that you have entered the correct address by double-checking the first few and last few characters.
- Enter the amount of cryptocurrency you want to transfer to your MetaMask wallet.
- Review the transaction details and ensure everything is correct.
- If you are satisfied with the details, click on the “Send” or “Confirm” button to initiate the transfer.
It’s important to note that the transfer may take some time to complete, depending on network traffic and the specific cryptocurrency you are transferring. Some cryptocurrencies may have faster transaction times compared to others.
Once the transfer is completed, you can go back to your MetaMask wallet to confirm that the funds have been successfully transferred. This can be done by clicking on the “Assets” tab in the MetaMask extension or app and looking for the transferred cryptocurrencies in your wallet.
By following these steps, you can take advantage of the MetaMask wallet’s functionality and securely transfer your purchased cryptocurrencies from Coinbase to MetaMask, giving you full control over your digital assets.
Go to the Send/Withdraw Section
Once you have downloaded and set up MetaMask, you can begin the process of sending crypto from Coinbase to your MetaMask wallet. Here are the steps to follow:
- Login to your Coinbase account by clicking on the “Sign In” button and entering your credentials.
- Once logged in, navigate to the “Send/Withdraw” section on the Coinbase dashboard.
- Select the cryptocurrency you want to send from Coinbase to MetaMask. Coinbase supports a wide range of cryptocurrencies such as Bitcoin, Ethereum, and Litecoin.
- Enter the recipient address, which is your MetaMask wallet address. To find your MetaMask wallet address, open the MetaMask extension and click on the account you want to use. Your wallet address will be displayed at the top of the page.
- Specify the amount of cryptocurrency you want to send. You can choose to enter the amount in either the cryptocurrency itself (e.g., 0.5 ETH) or in your local fiat currency (e.g., $100).
- Review the transaction details and double-check the recipient address to ensure it is correct.
- Click on the “Send” button to initiate the transfer. Coinbase may require you to verify the transaction using two-factor authentication or other security measures.
- Wait for the transaction to be completed. The speed of the transaction will depend on network congestion and the transaction fee you selected.
- Once the transaction is completed, you can check your MetaMask wallet to verify that the funds have been successfully transferred.
Following these steps will allow you to send cryptocurrencies from Coinbase to your MetaMask wallet. It is important to take extra precautions when dealing with cryptocurrencies and always double-check the recipient address to prevent any potential loss of funds.
Paste the MetaMask Wallet Address
After completing the previous steps, it’s time to paste your MetaMask wallet address. This is the address where you want to send your cryptocurrencies from Coinbase.
- Open MetaMask on your web browser by clicking on the extension icon.
- If you haven’t installed MetaMask yet, you can download it by visiting the official MetaMask website and following the provided instructions.
- Once MetaMask is installed, open it using the extension icon and create a new wallet or import an existing one.
- Copy the full wallet address from the MetaMask interface.
- Go back to the Coinbase platform and navigate to the “Send/Receive” section.
- Paste the MetaMask wallet address into the designated field.
- Double-check that the address is correct. Wallet addresses are usually a long combination of letters and numbers. Mistyping an address can result in the loss of your funds.
- Choose the cryptocurrency you wish to send from Coinbase to MetaMask. Coinbase supports a wide range of cryptocurrencies, so make sure you select the correct one.
- Enter the amount of the cryptocurrency you want to send. You can specify the amount using the currency itself (e.g., Bitcoin) or its equivalent value in your local currency.
- Review the transaction details one more time to ensure everything is accurate, including the amount and wallet address.
- Once you are satisfied with the information provided, click the “Send” or “Confirm” button to initiate the transfer.
Congratulations! You have successfully pasted your MetaMask wallet address and completed the necessary steps to send cryptocurrencies from Coinbase to MetaMask. Now you can take advantage of MetaMask’s features and manage your digital assets across multiple wallets.
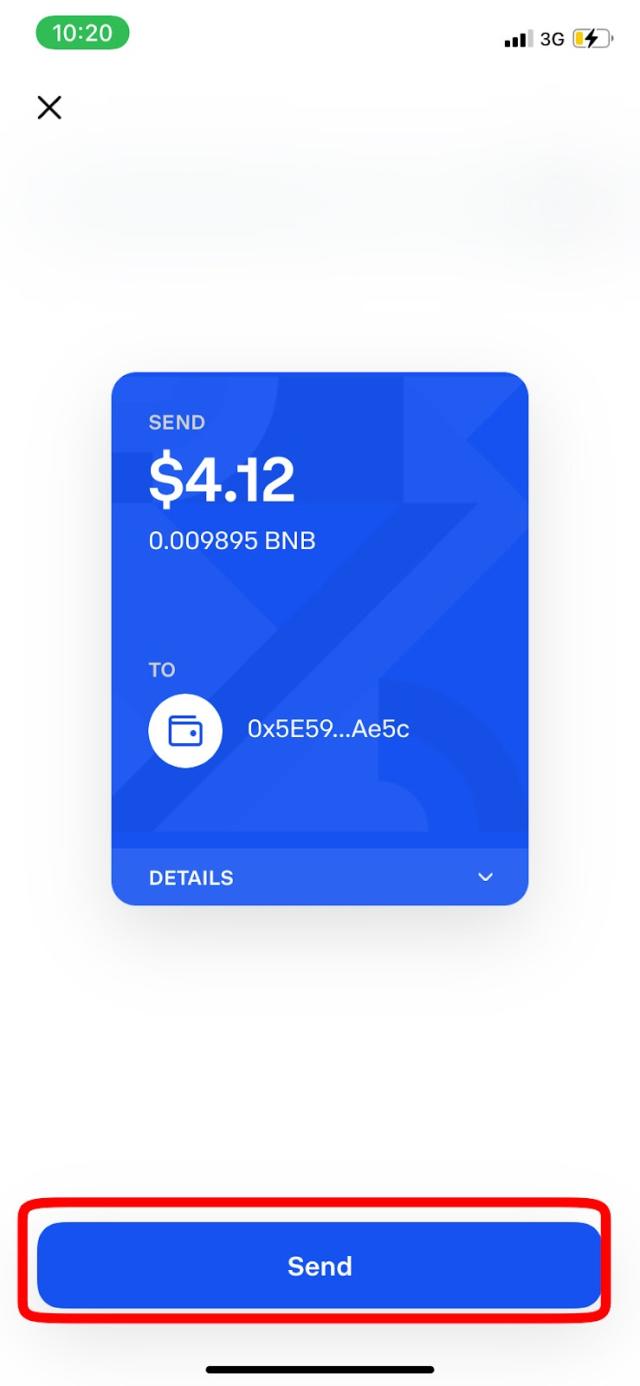
Specify the Amount and Confirm the Transfer

Once you have successfully connected your Coinbase account to MetaMask, you can proceed to specify the amount of cryptocurrency you want to send and confirm the transfer. Here are the steps to follow:
- Open MetaMask by clicking on the extension icon in your browser.
- In the MetaMask interface, click on the “Send” button.
- A new window will appear where you can fill in the recipient’s address. Make sure you copy the correct address from your MetaMask wallet or from the intended recipient. It is crucial to double-check the address to avoid sending the cryptocurrency to the wrong destination.
- Next, specify the amount of cryptocurrency you want to send. You can choose from the available options or enter a custom amount.
- Confirm the transaction details, including the amount, recipient’s address, and gas fees. Gas fees are the fees required to process the transaction on the Ethereum network and are paid to miners for their work.
- Review the details carefully and ensure that everything is correct. Once you are satisfied, click on the “Confirm” button to proceed with the transfer.
- MetaMask will prompt you to review the transaction details again. Make sure everything looks accurate before proceeding.
- If you have set up a password or biometric authentication for MetaMask, you may be prompted to enter it at this stage to confirm the transfer.
- Click on the “Submit” button to initiate the transfer.
Once the transfer is completed, you will be able to see the updated balance in your MetaMask wallet. You can also verify the transaction by checking the transaction history tab in MetaMask or using a blockchain explorer.
It is important to note that the steps may vary slightly depending on the version of MetaMask you are using or if you are sending cryptocurrencies other than Ethereum-based tokens. Nevertheless, the general process remains the same.
By following these steps, you can effectively transfer your cryptocurrencies from Coinbase to MetaMask, taking full advantage of MetaMask’s features and functionalities.
Step 4: Verify the Transaction on MetaMask
After completing the transaction on Coinbase, the next step is to verify the transaction on your MetaMask wallet. This ensures that the transfer of cryptocurrencies from Coinbase to MetaMask has been successfully completed.
To verify the transaction on MetaMask, follow these steps:
- Open your MetaMask wallet by clicking on the MetaMask extension icon in your browser.
- If prompted, enter your MetaMask password to unlock your wallet.
- On the main page of MetaMask, you will see a list of recent transactions. Look for the transaction you just made from Coinbase.
- Click on the transaction to view its details. Verify that the transaction details match the transfer you made.
- If the transaction details are correct, click on the “Confirm” button to complete the verification process. MetaMask will then broadcast the transaction across the blockchain network.
- Once the transaction is confirmed, you will see a confirmation message indicating that the transaction has been successfully completed.
- You can now check your MetaMask wallet balance to ensure that the transferred cryptocurrencies have been added to your wallet.
It is important to verify the transaction on MetaMask as it provides an extra layer of security and ensures that your cryptocurrencies are safely transferred from Coinbase to your MetaMask wallet.
For those who are new to MetaMask, it is recommended to download and backup the wallet’s seed phrase or private key. This is essential and acts as a method to restore access to your wallet in case you lose your device or for other security purposes.
By using MetaMask, you can take advantage of its features to securely store, manage, and interact with various cryptocurrencies. It supports a wide range of currencies and can also be connected to third-party wallets for those who prefer to use their full wallets.
Frequently Asked Questions:
What is Coinbase?
Coinbase is a popular cryptocurrency exchange and wallet platform that allows users to buy, sell, and store various cryptocurrencies.
What is MetaMask?
MetaMask is a cryptocurrency wallet that allows users to interact with decentralized applications (dApps) on the Ethereum network.
Can I transfer cryptocurrency from Coinbase to MetaMask?
Yes, you can transfer cryptocurrency from Coinbase to MetaMask.
How do I send crypto from Coinbase to MetaMask?
To send crypto from Coinbase to MetaMask, you need to first open your MetaMask wallet and copy your wallet address. Then, go to Coinbase, select the cryptocurrency you want to send, paste your MetaMask wallet address as the recipient, enter the amount you want to send, and confirm the transaction. The crypto will be transferred to your MetaMask wallet.
Are there any fees for transferring crypto from Coinbase to MetaMask?
Yes, there may be fees for transferring crypto from Coinbase to MetaMask. Coinbase charges network fees for sending cryptocurrency, and the Ethereum network may also charge gas fees for transactions.
How long does it take to transfer crypto from Coinbase to MetaMask?
The time it takes to transfer crypto from Coinbase to MetaMask can vary depending on network congestion and other factors. In general, it can take a few minutes to an hour for the transaction to be confirmed and for the crypto to appear in your MetaMask wallet.
Video:
How To Send AVAX From Coinbase To MetaMask