If you’re interested in exploring the world of cryptocurrencies, you’ve probably heard of Polygon – a popular crypto network that offers fast and low-cost transactions. But how do you add the Polygon network to your crypto wallet?
One way to do it is by using polygonscan, a leading blockchain explorer for the Polygon network. By accessing polygonscan, you can easily interact with the Polygon network and add it to your wallet.
First, you need to open your crypto wallet. Then, search for the option to add a new network or add a custom network. Once you find it, you’ll need to fill in some key details. Make sure to enter “Polygon” as the network name and “MATIC” as the network symbol. For the RPC URL, use “https://polygon-rpc.com” and set the Chain ID to “137”.
After you’ve filled in the necessary information, follow the instructions to complete the process. It’s important to double-check all the details before confirming. Once you’ve added the Polygon network, you should see the option to switch between different networks in your wallet.
Now that you have successfully added the Polygon network to your wallet, you can start enjoying the benefits it offers. With Polygon, you can experience faster transaction speeds and lower fees compared to other networks. Stay up to date with the latest news and notifications from Polygon to make the most of your crypto journey.
In conclusion, adding the Polygon network to your crypto wallet is a simple process that can greatly enhance your crypto experience. By following the steps outlined above and staying informed about the latest updates, you’ll be well-equipped to dive into the exciting world of Polygon and make the most of this innovative crypto network.
- What is Polygon Network?
- Why Add Polygon Network to Your Crypto Wallet?
- Methods to Add Polygon Network to Your Crypto Wallet
- Add the Polygon Network Manually
- Step 1: Open Your Crypto Wallet
- Step 2: Go to Network Settings
- Step 3: Add the Polygon Network Details
- Using Polygonscan
- Step 1: Open the Polygonscan Website
- Step 2: Connect Your Crypto Wallet to Polygonscan
- Step 3: Add the Polygon Network to Your Wallet
- Enjoy Using Polygon Network on Your Crypto Wallet
- Frequently Asked Questions:
- What is Polygon Network?
- Can I use any crypto wallet to add Polygon Network?
- Are there any transaction fees for using Polygon Network?
- Video:
- How to Add and Receive Matic in Your Trust Wallet
What is Polygon Network?

Polygon Network, formerly known as Matic Network, is a scaling solution for Ethereum that aims to address the limitations of the Ethereum network, such as high transaction fees and slow transaction confirmation times. It is a Layer 2 scaling solution that uses a combination of PoS (Proof of Stake) and Plasma frameworks to provide a more efficient and scalable infrastructure for decentralized applications (dApps).
The Polygon Network allows developers to create and deploy their own separate blockchains, known as “sidechains,” that are connected to the Ethereum mainnet. These sidechains, also referred to as “polygons,” are interoperable with each other and the Ethereum network, allowing for seamless communication and value transfer between different chains.
By using the Polygon Network, developers can enjoy faster and cheaper transactions compared to the Ethereum mainnet. This is achieved by aggregating multiple transactions into a single batch, thereby reducing congestion and lowering fees. Additionally, the network provides finality with checkpoints on the Ethereum mainnet, ensuring the security and immutability of transactions.
Users can interact with applications built on the Polygon Network by adding the network to their crypto wallets. This allows them to seamlessly transact with polygons and access the features and functionalities of dApps built on the network. There are several ways to add the Polygon Network to a crypto wallet, such as using the official Polygon Wallet, or manually adding it through wallet settings using the network’s RPC endpoint.
To explore transactions and activities on the Polygon Network, users can utilize block explorers like PolygonScan. These explorers provide a user-friendly interface to search and view transactions, addresses, and smart contracts on the network, making it easier to monitor and track activities within the ecosystem.
Why Add Polygon Network to Your Crypto Wallet?
The Polygon network, formerly known as Matic Network, is a popular layer 2 scaling solution for Ethereum. By adding the Polygon network to your crypto wallet, you can benefit from its fast and low-cost transactions, enhanced scalability, and access to a wide range of decentralized applications (DApps).
Here are a few reasons why you should consider adding the Polygon network to your crypto wallet:
- Fast and Low-Cost Transactions: Polygon uses a Proof-of-Stake (PoS) consensus mechanism, allowing for faster and cheaper transactions compared to the Ethereum network. This makes it ideal for day-to-day transactions and activities.
- Enhanced Scalability: With Polygon, you can enjoy enhanced scalability compared to the Ethereum network. The network is designed to handle a large number of transactions, resulting in quicker and more efficient processing of transactions and smart contracts.
- Access to Diverse Applications: The Polygon network has a growing ecosystem of decentralized applications across various sectors, including finance, gaming, and NFTs. By adding Polygon to your wallet, you can explore and participate in these applications, gaining access to a wide range of services and opportunities.
To add the Polygon network to your crypto wallet, you can either do it manually or use wallet integration.
If you prefer to add Polygon manually, you can follow these steps:
- Open your crypto wallet and navigate to the network settings.
- Add a custom network using the following details:
- Save the network settings.
- You should now see the Polygon network added to your wallet, and you can switch to it whenever you want to use Polygon.
| Network Name | Polygon |
| New RPC URL | https://rpc-mainnet.maticvigil.com/ |
| Chain ID | 137 |
| Symbol | POLYGON |
| Block Explorer URL | https://polygonscan.com/ |
In conclusion, adding the Polygon network to your crypto wallet can provide you with faster and more cost-effective transactions, improved scalability, and access to a diverse range of applications. Whether you choose to add it manually or through wallet integration, the benefits of including Polygon in your wallet are worth considering.
Methods to Add Polygon Network to Your Crypto Wallet
If you want to add the Polygon network to your crypto wallet, there are a few methods you can follow. This will allow you to access and use Polygon’s features and services within your wallet.
1. Using the Wallet’s Built-in Functionality
Some crypto wallets have built-in functionality that allows you to easily add new networks, including the Polygon network. Here are the general steps to follow:
- Open your crypto wallet and navigate to the network settings.
- Look for an option to add a custom network or an Ethereum-compatible network.
- Fill in the details for the Polygon network, including the network name, RPC URL, chain ID, symbol, and block explorer URL.
- Click “Save” or “Add” to add the Polygon network to your wallet.
This method allows you to add the Polygon network in a few simple steps, without the need for any additional tools or manual configurations.
2. Manually Adding the Polygon Network
If your wallet doesn’t have a built-in functionality for adding new networks, you can still manually add the Polygon network. Here’s how to do it:
- Find the network settings or network management section in your wallet.
- Click on the option to add a custom network or an Ethereum-compatible network.
- Fill in the following details for the Polygon network:
- Network name: Polygon
- RPC URL: https://rpc-mainnet.matic.network
- Chain ID: 137
- Symbol: MATIC
- Block explorer URL: https://polygonscan.com
- Save the settings or add the network to your wallet.
By manually adding the Polygon network with the provided details, you can ensure that your wallet is connected to the correct network.
3. Following a Step-by-Step Guide
If you’re new to adding custom networks to your crypto wallet or prefer a more detailed guide, you can find step-by-step instructions on how to add the Polygon network to popular wallets online. These guides often include screenshots and additional explanations to assist you throughout the process.
4. Using Third-Party Tools
In addition to the above methods, there are also third-party tools available that can help you add the Polygon network to your crypto wallet with ease. These tools often provide a simplified interface and automate the process for you.
By utilizing one of these methods, you can add the Polygon network to your crypto wallet and start enjoying the benefits and features it offers.
Add the Polygon Network Manually
If your crypto wallet doesn’t have the option to automatically add the Polygon network, you can add it manually by following these steps:
- Open your crypto wallet and navigate to the network settings.
- Click on the option to manually add a custom network.
- Enter the following details for the Polygon network:
| Network Name: | Polygon |
| New RPC Url: | https://rpc-mainnet.matic.network |
| ChainID: | 137 |
| Symbol: | MATIC |
| Block Explorer URL: | https://polygonscan.com |
Once you have entered these details, click on the “Add” or “Save” button to add the Polygon network to your wallet manually.
Now you should be able to see and interact with Polygon and its tokens in your crypto wallet. Close the network settings and explore the world of Polygon!
Step 1: Open Your Crypto Wallet
To add Polygon Network to your crypto wallet, you need to ensure that your wallet supports polygon. There are several crypto wallets that are compatible with polygons, such as MetaMask, Trust Wallet, and Coinbase Wallet. Follow the steps below to open your crypto wallet:
- If you don’t have a crypto wallet, download and install one that supports Polygon Network. Visit the official websites of the compatible wallets mentioned above and follow the instructions provided to download and install the wallet application.
- Open the crypto wallet application on your device after installation.
- If you already have an existing crypto wallet, make sure it is updated to the latest version before proceeding.
- Enter your wallet credentials (username and password) to log in. If you are using a hardware wallet, follow the instructions provided by the wallet manufacturer to connect it to your device.
Once you have opened your crypto wallet, you are ready to proceed to the next steps to add the Polygon Network. Make sure to close any other applications or tabs related to your wallet for security purposes.
Step 2: Go to Network Settings
Now that you have installed the MetaMask extension, you need to go to the network settings to add the Polygon network to your wallet.
To do this, follow these steps:
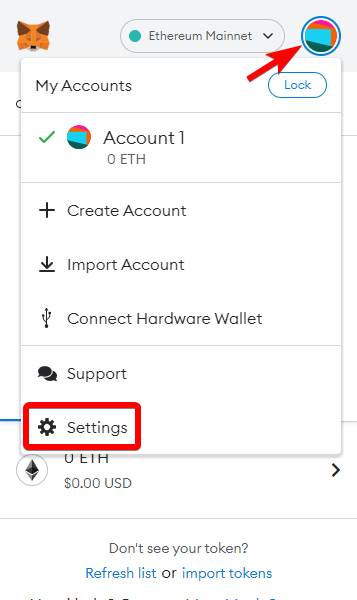
- Click on the MetaMask extension in your browser to open it.
- Click on the profile picture icon at the top right corner of the MetaMask popup.
- Click on the “Settings” option in the dropdown menu.
- In the settings menu, select the “Networks” tab.
Once you are in the Networks tab, you have two options to add the Polygon network to your wallet – either with the help of Polygonscan or manually.
If you want to add the Polygon network using Polygonscan, you can follow these steps:
- Open a new tab in your browser and go to polygonscan.com.
- On the Polygonscan website, click on the “Chain” dropdown and select “Polygon Mainnet”.
- Scroll down and copy the URL listed under “Chain ID”.
- Go back to the MetaMask settings menu and click on the “+ Add Network” button.
- In the “New Network” form, paste the Chain ID that you copied from Polygonscan into the “Network Name” field.
- Configure the other network settings as follows: Network Name: Polygon Mainnet, New RPC URL: https://polygon-mainnet.g.alchemy.com/v2/Your-API-Key, Chain ID: Paste the Chain ID from Polygonscan, Currency Symbol: MATIC, Block Explorer URL: https://polygonscan.com.
- Click on the “Save” button.
If you prefer to add the Polygon network manually without using Polygonscan, you can follow these steps:
- Click on the “Custom RPC” option in the “Networks” tab.
- In the “New Network” form, enter the following details:
- Network Name: Polygon Mainnet
- New RPC URL: https://polygon-mainnet.g.alchemy.com/v2/Your-API-Key
- Chain ID: 137
- Currency Symbol: MATIC
- Block Explorer URL: https://polygonscan.com
- Click on the “Save” button.
Once you have added the Polygon network to your wallet, you will be able to interact with Polygon-based dapps and manage your Polygon assets.
Step 3: Add the Polygon Network Details

Once you have installed and opened your crypto wallet, you need to add the details of the Polygon network. This will allow you to interact with the Polygon network and its tokens.
- Open your crypto wallet and navigate to the network settings. This can usually be found in the settings or network section of your wallet.
- Click on “Add Network” or a similar option to add a new network.
- Manually enter the following details to add the Polygon network:
| Network Name: | Polygon Mainnet |
| New RPC URL: | https://polygon.polygonscan.com/ |
| Chain ID: | 137 |
| Symbol: | POLY |
| Block Explorer URL: | https://polygonscan.com/ |
Make sure you enter the details exactly as mentioned above to ensure proper functionality.
After entering the details, click on “Save” or a similar option to save the network details.
Once the network details are saved, you will receive a notification confirming the addition of the Polygon network to your crypto wallet. You can now close the network settings.
If you want to switch to the Polygon network, simply go to the network selection in your crypto wallet and select “Polygon Mainnet” or the network name you entered while adding the network details.
That’s it! You have successfully added the Polygon network to your crypto wallet. Now you can manually add Polygon tokens or follow any specific instructions provided by the token issuer to add their tokens.
Using Polygonscan
If you want to add the Polygon network to your crypto wallet manually, you can do so with the help of Polygonscan. Polygonscan is a blockchain explorer specifically designed for the Polygon network, where you can find detailed information about transactions, addresses, contracts, and more.
Here’s a step-by-step guide on how to use Polygonscan:
- Open your web browser and go to the Polygonscan website: polygonscan.com.
- In the search bar, enter the address of the Polygon network you want to add to your wallet and press Enter.
- Once the address is displayed, you can navigate through the different tabs to explore transaction history, token holdings, and more.
- If you want to receive notifications for specific activities on the Polygon network, you can click on the “Create Notification” button and set up custom alerts.
- To follow a specific address or contract on Polygonscan, click on the “Click to Follow” button next to the address or contract you’re interested in.
By using Polygonscan, you can get a comprehensive overview of the Polygon network and stay updated with the latest activities happening on the network.
Step 1: Open the Polygonscan Website
In order to add Polygon network to your crypto wallet, you need to manually follow a few steps. The first step is to open the Polygonscan website.
Polygonscan is a block explorer for the Polygon network. It allows you to explore and search for transactions, addresses, and other information related to Polygon. By using Polygonscan, you can easily manage and monitor your Polygon tokens and transactions.
To open the Polygonscan website, you can simply type “Polygonscan” in your preferred search engine, such as Google. The search engine will display the official website as one of the top results. Click on the link to open Polygonscan.
Alternatively, you can directly type “polygonscan.com” in the address bar of your web browser and press Enter. This will also take you to the Polygonscan website.
Once you have opened the Polygonscan website, you can proceed to the next step to add Polygon network to your crypto wallet.
Step 2: Connect Your Crypto Wallet to Polygonscan

Once you have added the Polygon network to your crypto wallet, the next step is to connect your wallet to Polygonscan. Polygonscan is a blockchain explorer for the Polygon network, where you can view and verify transactions, check balances, and explore the network.
To connect your crypto wallet to Polygonscan, follow these steps:
- Open your preferred web browser and go to the Polygonscan website.
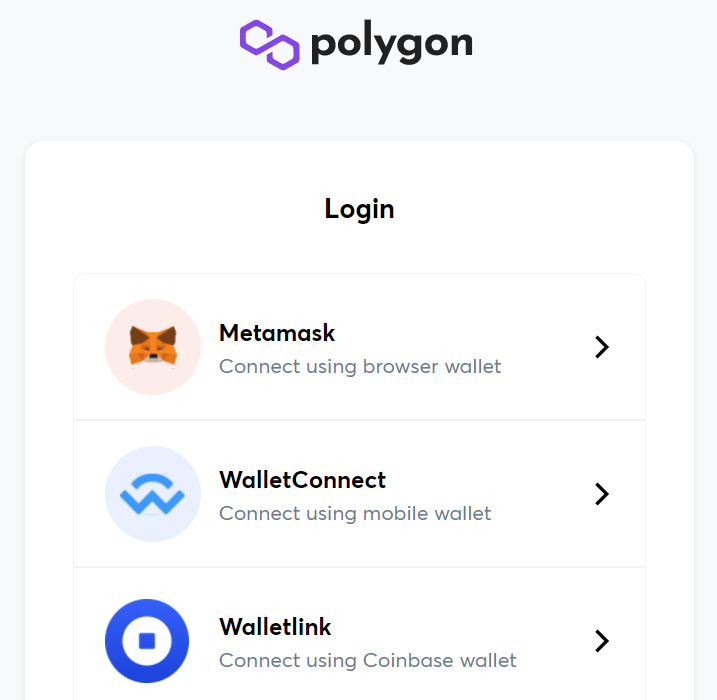
- Click on the “Connect Wallet” button located in the top-right corner of the website.
- A notification will pop up, showing a list of supported wallets. Select your desired wallet from the list.
- Depending on your wallet, you may need to grant permission for Polygonscan to access your wallet information. Follow the prompts and authorize the connection.
- Once your wallet is connected, you will see your wallet address displayed on the Polygonscan interface.
- You can now navigate through Polygonscan to explore the Polygon network, view your transaction history, and access other features provided by the explorer.
In case the connection is not established automatically, you may need to manually add the Polygon network to your wallet by entering the network details. Make sure to consult the documentation or support resources of your specific wallet for instructions on how to manually add networks.
After successfully connecting your crypto wallet to Polygonscan, you can access key information and perform various actions on the Polygon network directly from your wallet interface. Remember to close any pop-up notifications or prompts once the connection is established.
Step 3: Add the Polygon Network to Your Wallet

Now that you have created your new wallet and generated an address on the Polygon network, the next step is to add the Polygon network to your wallet.
There are several ways to add the Polygon network to your wallet:
- Using the official website: Go to PolygonScan, and find the close button on the notification on the top of the page. Click on it to close the notification. Then, click on the “Add Polygon Network” button. Follow the instructions on the website to add the network to your wallet.
- Manually adding the network: If your wallet does not have the option to add networks automatically, you will need to add the Polygon network manually. Here are the details you need:
- Network Name: Polygon
- New RPC URL: https://rpc-mainnet.maticvigil.com/
- Chain ID: 137
- Symbol: MATIC
- Block Explorer URL: https://polygonscan.com/
Once you have added the Polygon network to your wallet, you will be able to interact with polygons on the network and perform various transactions.
Enjoy Using Polygon Network on Your Crypto Wallet
If you have successfully added the Polygon network to your crypto wallet, you are now ready to start enjoying all the benefits it has to offer. Here are a few tips to help you make the most of your Polygon experience:
- Get Up Close with Polygonscan: Polygonscan is an essential tool for navigating the Polygon network. It allows you to explore and monitor transactions, contracts, and addresses on the network. Make sure to familiarize yourself with this tool to better understand the transactions and activities happening on the network.
- Stay Updated with Notifications: To stay on top of your Polygon network activities, enable notifications on your crypto wallet. This way, you will receive updates on transactions, contract interactions, and other important events happening on the network. Notifications provide real-time information, ensuring you don’t miss out on any crucial updates.
- Follow Official Channels: To stay connected with the Polygon community, make sure to follow official Polygon social media channels such as Twitter, Telegram, and Reddit. These channels provide important updates, announcements, and discussions related to the Polygon network. By staying engaged with the community, you can gain valuable insights and stay informed about upcoming events and developments.
By following these tips, you can fully enjoy using the Polygon network on your crypto wallet. Remember to explore Polygonscan, enable notifications, and stay connected with the community to make the most of your Polygon experience.
Frequently Asked Questions:
What is Polygon Network?
Polygon Network is a Layer 2 scaling solution for Ethereum blockchain that aims to provide faster and cheaper transactions.
Can I use any crypto wallet to add Polygon Network?
Not all crypto wallets support Polygon Network out of the box. However, many popular wallets, such as MetaMask, Trust Wallet, and MyEtherWallet, allow you to manually add custom networks like Polygon. It is recommended to check if your wallet supports Polygon or has the functionality to add custom networks.
Are there any transaction fees for using Polygon Network?
Yes, there are transaction fees associated with using Polygon Network. These fees are typically lower compared to the fees on the Ethereum mainnet. The fees on Polygon are paid in MATIC, the native cryptocurrency of the network. The exact fee amounts can vary depending on the network congestion and the type of transaction you are making.
Video:
How to Add and Receive Matic in Your Trust Wallet